容器编排技术 一、前言
了解Jenkins的离线安装步骤
掌握Gitlab的使用和管理
了解CICD的配置步骤和方法
二、基础环境部署
机器
IP
作用
master
192.168.100.10
K8s 的 master 节点、Harbor 节点、CI/CD 节点
node
192.168.100.20
K8s 的 node 节点
在这两台机器上提前部署好 CentOS 7 + Docker + Kubernetes + Harbor 环境,准备好 XianDian-PaaS-v2.4.iso 包
1. 安装 Jenkins 环境 1.1 查看 K8s 集群状态和节点信息 1 2 3 4 5 6 7 8 9 10 $ kubectl get csin v1.19+
1.2 安装 Jenkins 1 2 3 4 5 6 7 8 $ docker run -d --name jenkins -p 8080:8080 -u root \which docker):/usr/bin/docker \
然后在电脑浏览器输入 http://192.168.100.10:8080 来访问 Jenkins
然后进入容器,输入密码
1 2 $ docker exec jenkins cat /var/jenkins_home/secrets/initialAdminPassword
下面的 2169d1cbaa1546f396c0571477d2ce6a 就是我们的密码,输入密码并点击 “继续”
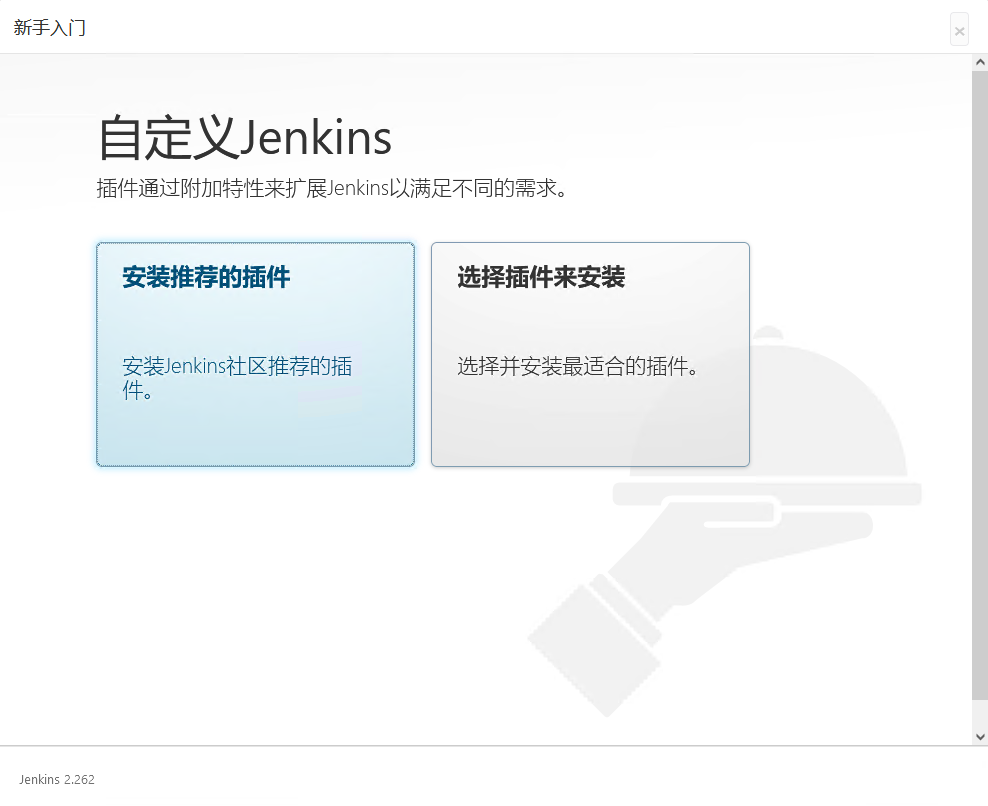
然后点击 “安装推荐的插件”
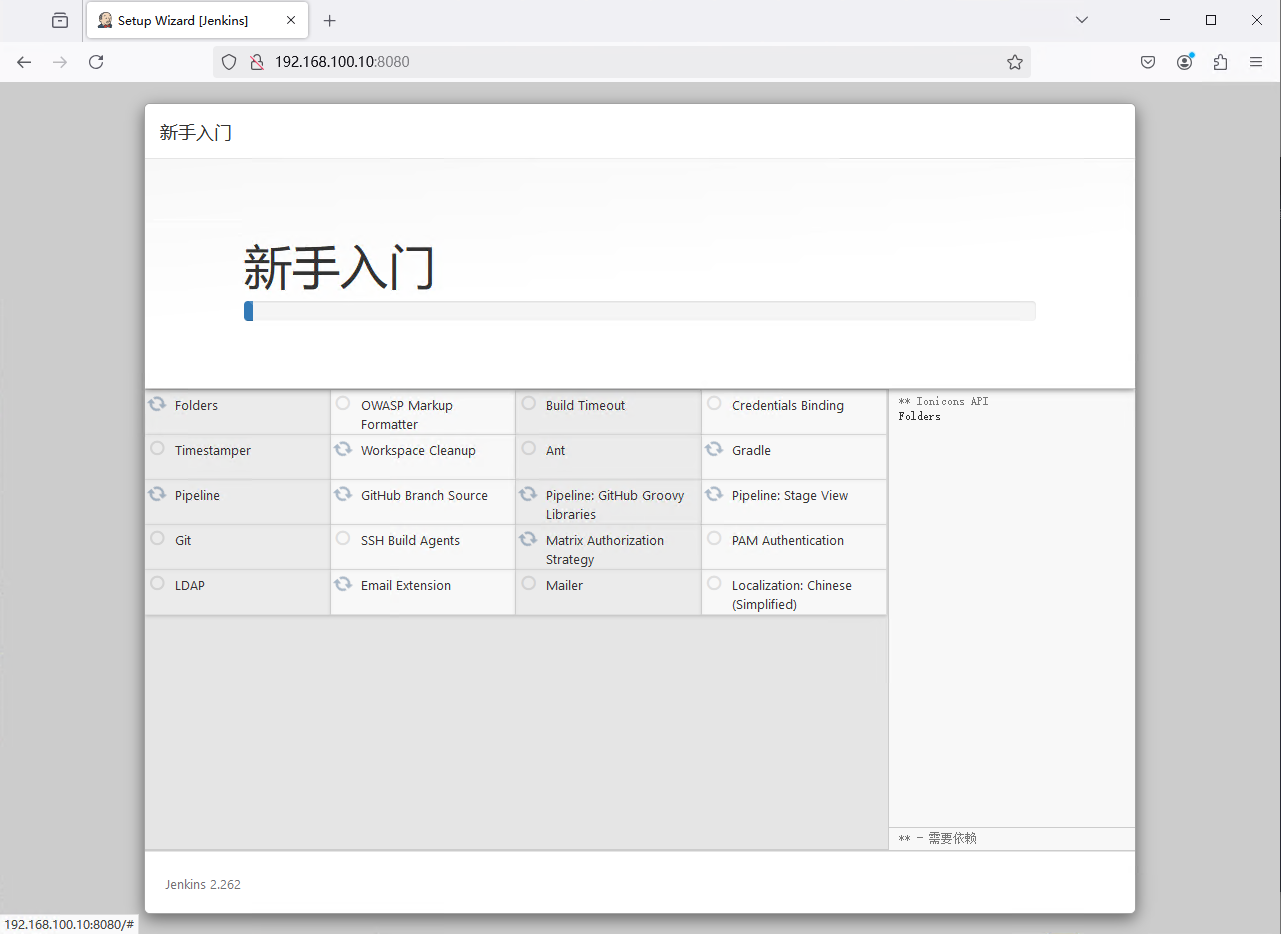
插件安装完成后自动转入管理员用户创建界面
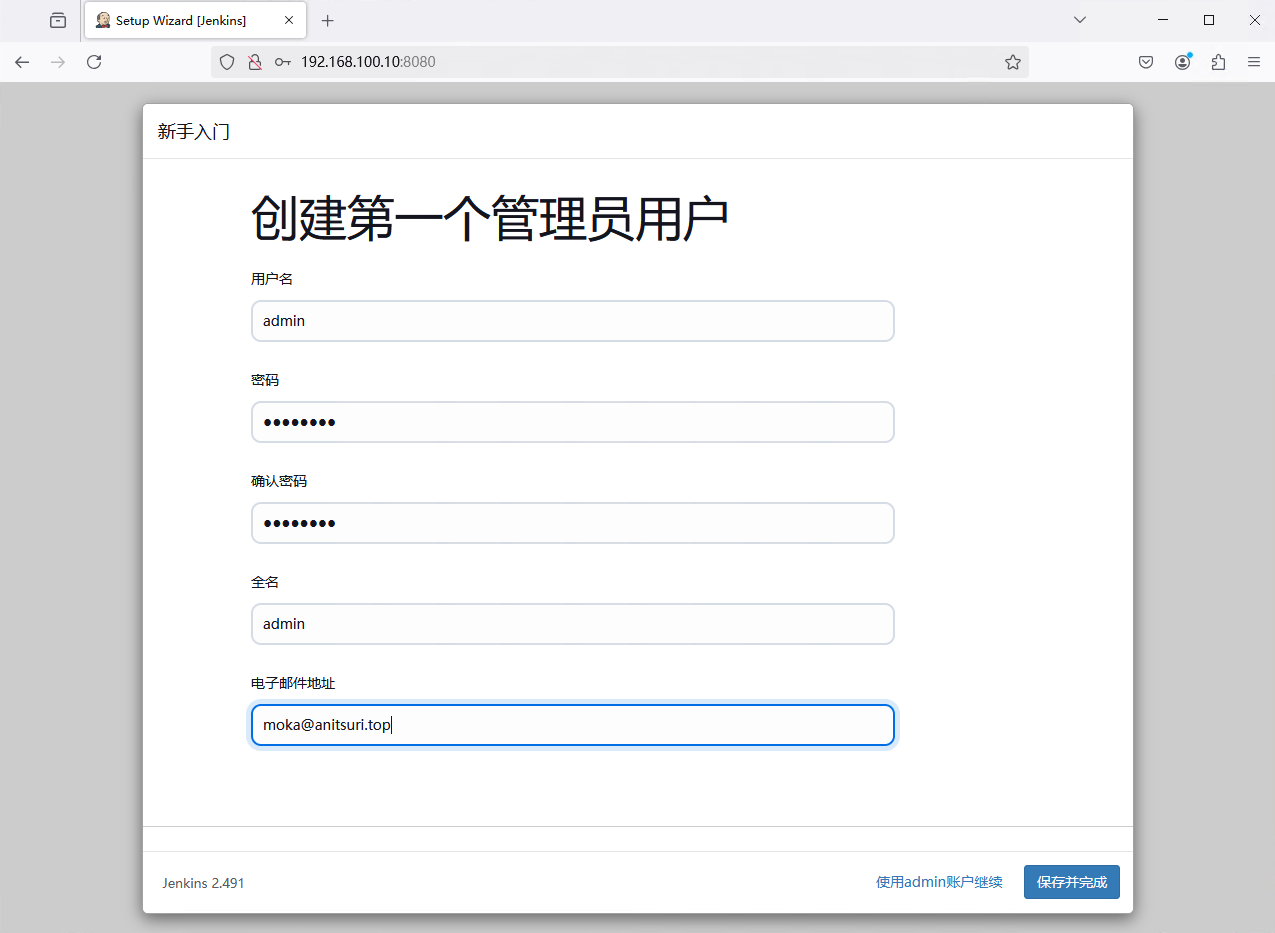
输入用户信息,点击“保存并完成”
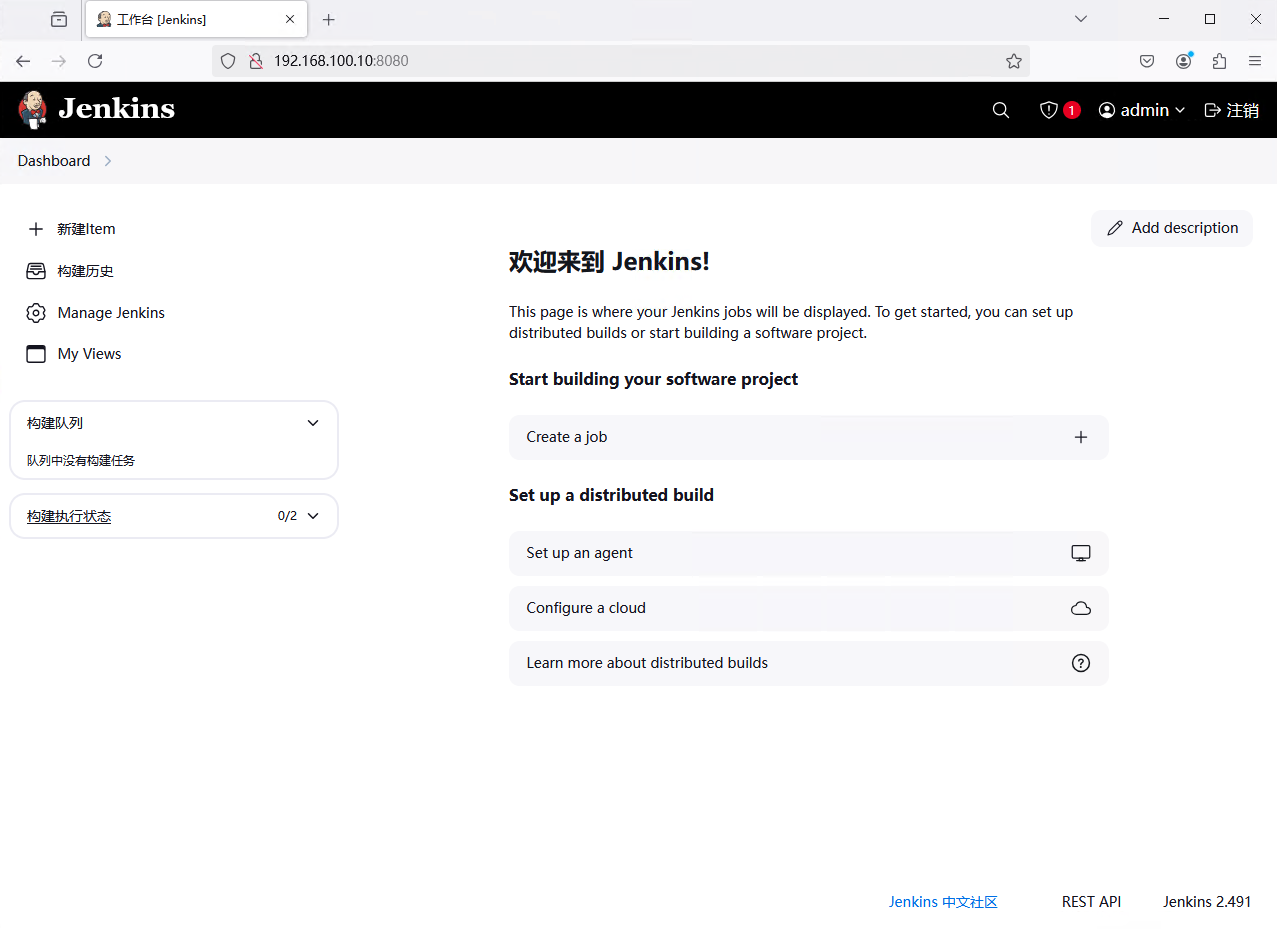
配置完URL后使用新建的用户登录 Jenkins
2. 部署 GitLab 2.1 启动 GitLab GitLab 是利用 Ruby on Rails 一个开源的版本管理系统,实现一个自托管的 Git 项目仓库,可通过 Web 界面进行访问公开的或者私人项目。
与 Github 类似,GitLab 能够浏览源代码,管理缺陷和注释,可以管理团队对仓库的访问,它非常易于浏览提交过的版本并提供一个文件历史库,团队成员可以利用内置的简单 聊天程序(Wall) 进行交流。Gitlab 还提供一个代码片段收集功能可以轻松实现代码复用,便于日后有需要的时候进行查找
本项目Gitlab与Harbor共用一台服务器
1 2 3 4 5 6 $ docker run -d -h gitlab -p 1022:22 -p 81:80 -p 443:443 \
GitLab 启动较慢 ,可以通过 docker logs 查看启动状态
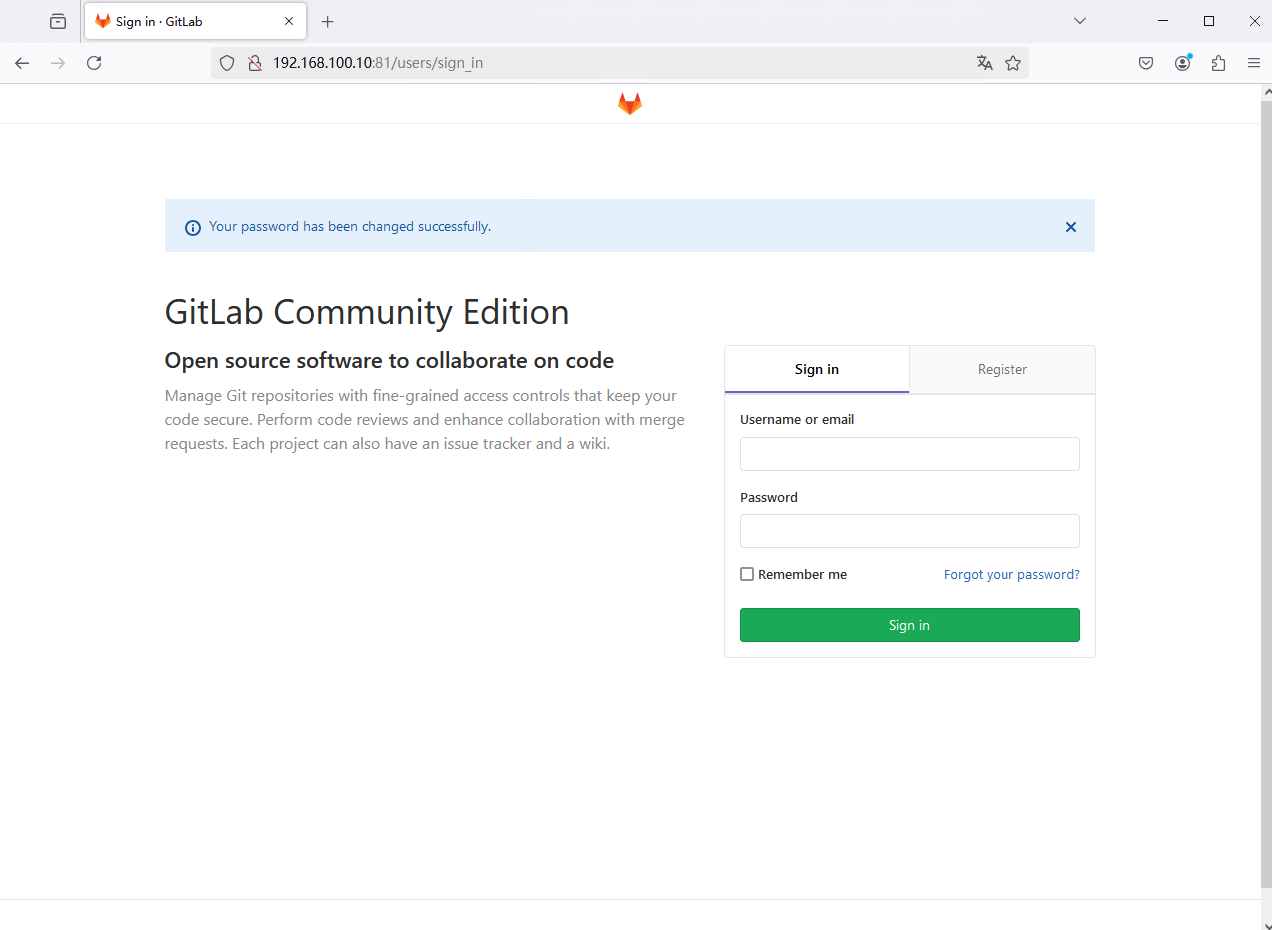
启动完成后,在浏览器上访问 http://192.168.100.10:81 来进入刚刚搭建的本地 GitLab
然后设置 root 用户信息
然后使用 root 用户登录
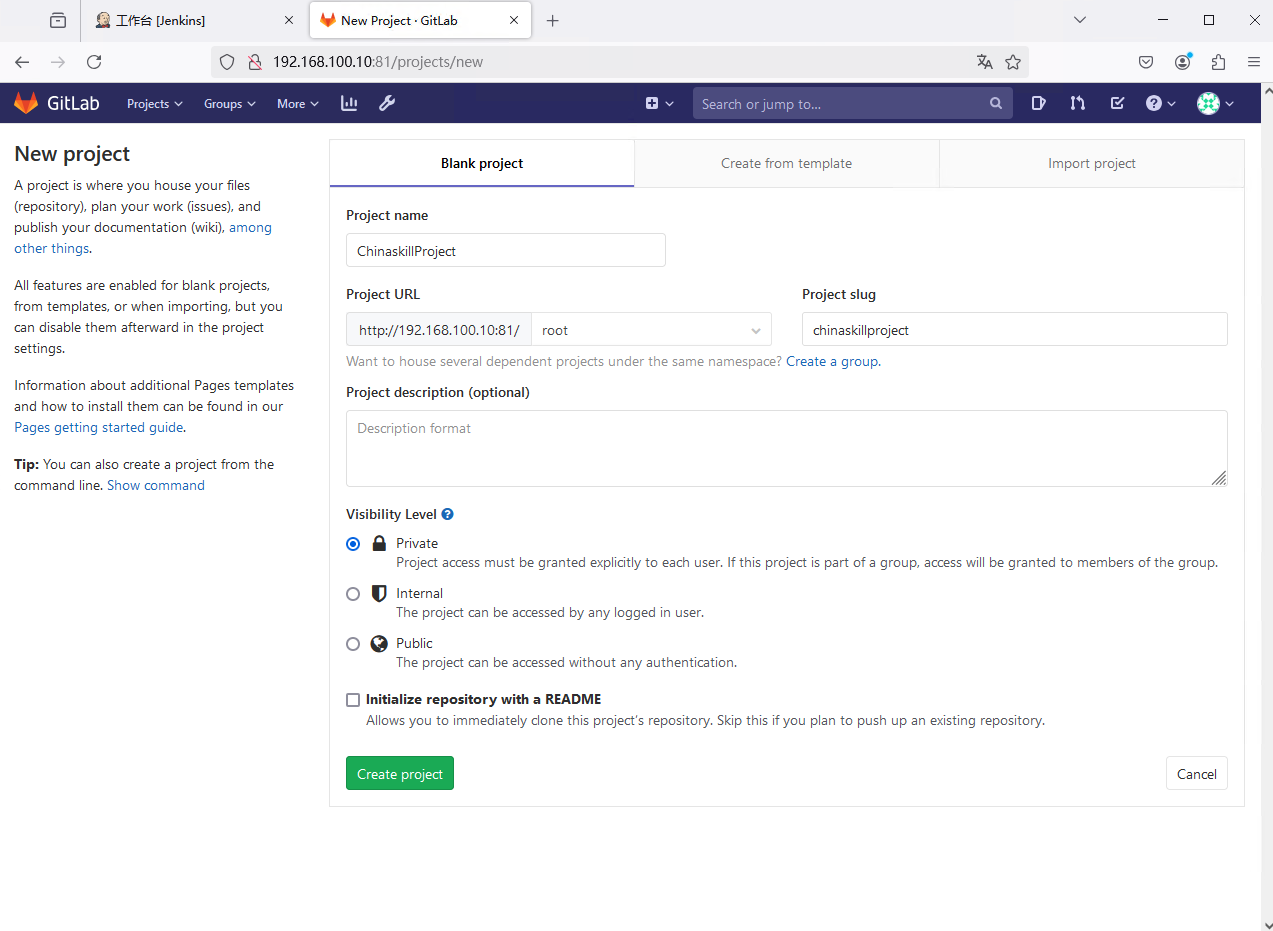
2.2 创建项目 点击 “Create a project”(创建项目),创建项目 “ChinaskillProject”,Visibility Level(可见等级) 设置为 “Public”
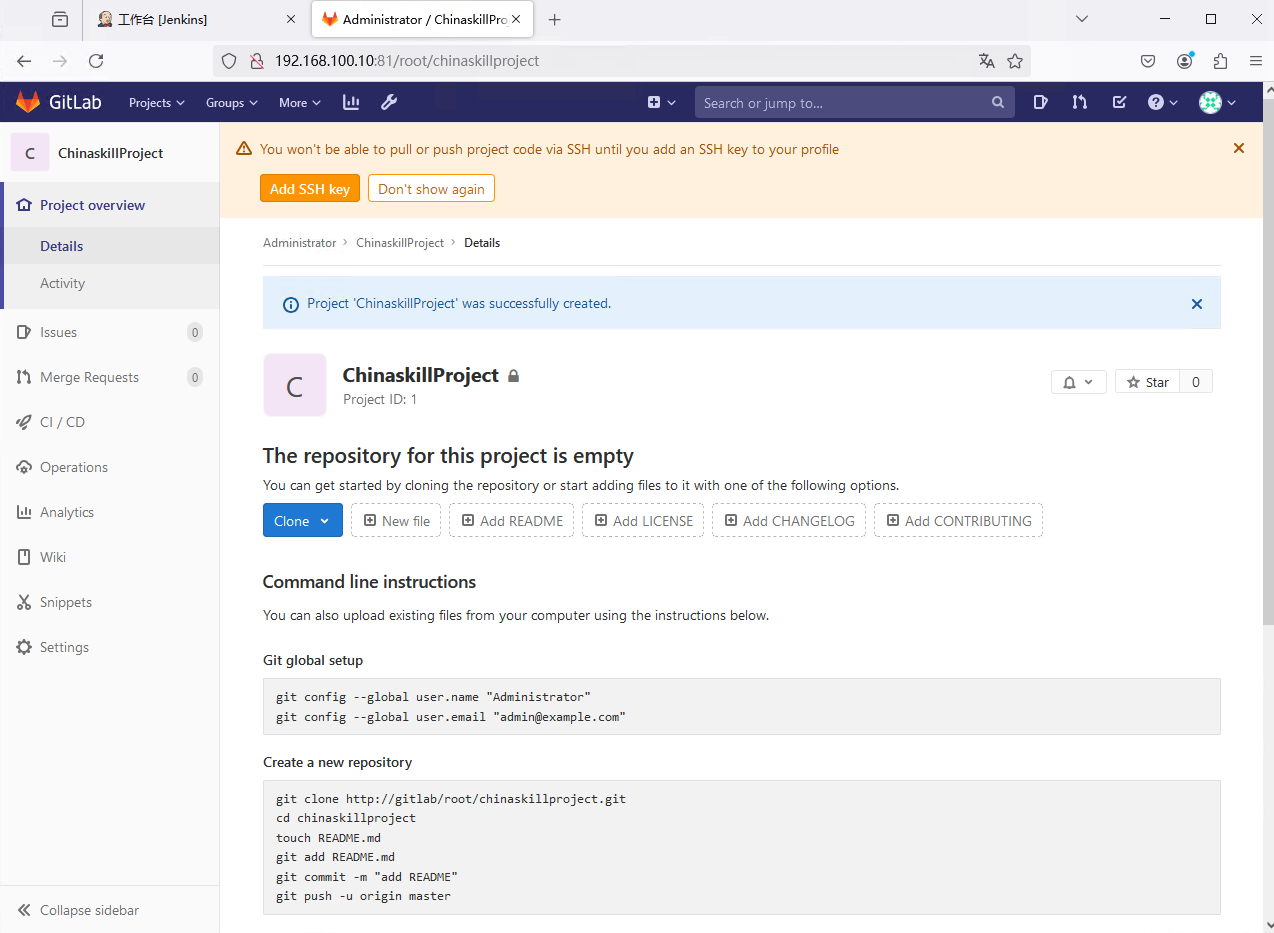
点击 “Create Project”(创建项目),然后自动进入项目
根据提示,配置 SSH 公钥到 GitLab 上
1 2 $ ssh-keygen -t rsacat ~/.ssh/id_rsa.pub
然后复制出来的内容,到 GitLab 上
GitLab 上点击 “Add SSH Key”(添加 SSH 密钥),在 Key 栏里面粘贴你刚才复制的内容,Title 默认即可,Expires at(有效期截至到) 随便选,然后点击 “Add Key”(添加密钥)
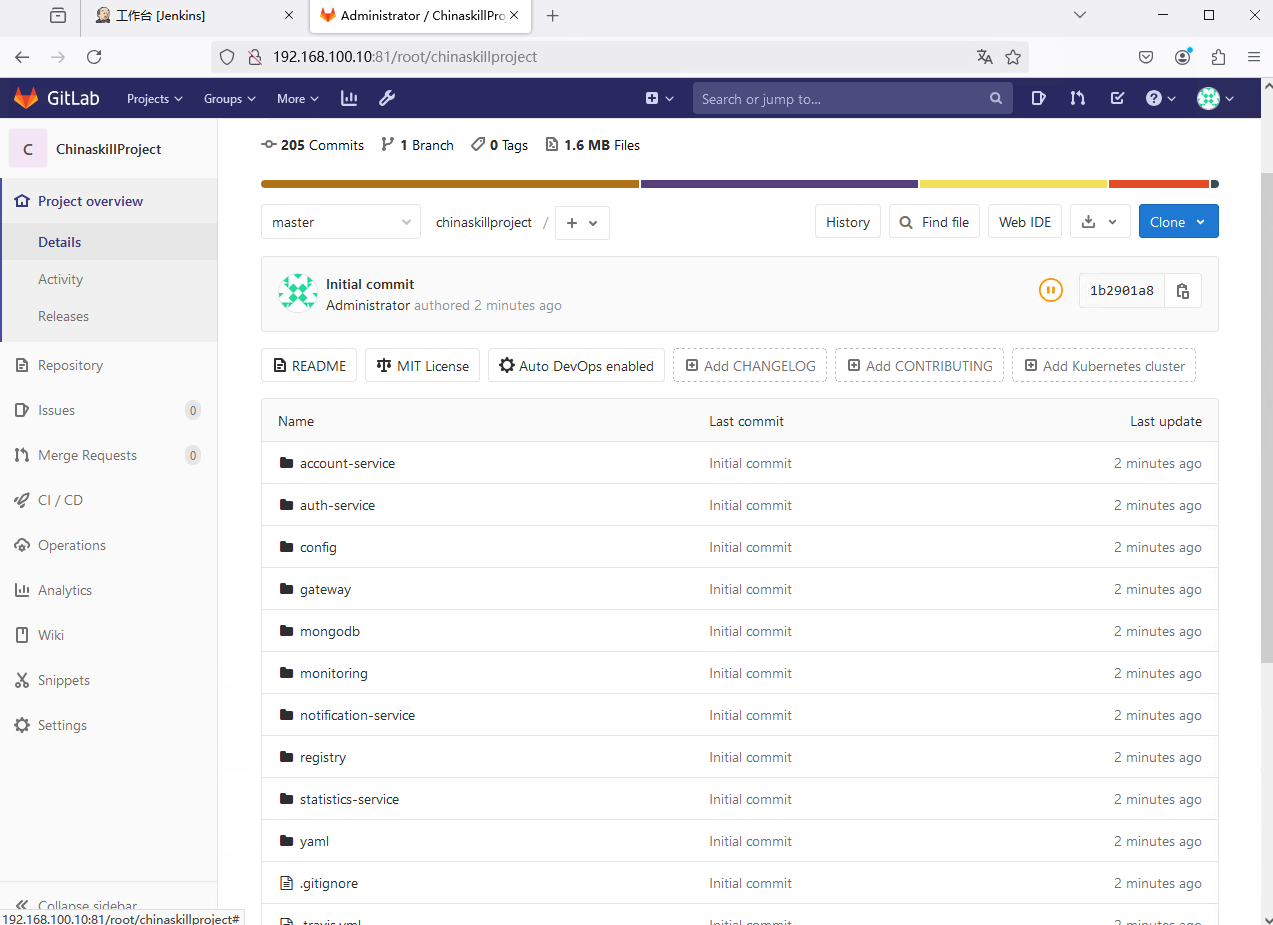
然后将 之前准备好的 XianDian-PaaS-v2.4.iso 上传并挂载到虚拟机, git push 源代码到 GitLab 的 ChinaskillProject 项目
1 2 3 4 5 6 7 8 9 10 11 12 13 14 15 16 17 18 19 20 21 22 23 24 25 26 27 28 29 30 31 32 33 34 35 36 37 38 39 40 41 42 43 44 45 46 47 48 $ sudo yum install -y gitcp -rf /mnt/ChinaskillProject/ /optls -al /opt/ChinaskillProject/cd /opt/ChinaskillProject/"Initial commit" for 'http://192.168.100.10:81' : rootfor 'http://[email protected] :81' : done .done .done .done .
刷新网页,ChinaskillProject 项目中已经有我们刚刚 git push 上去的文件了
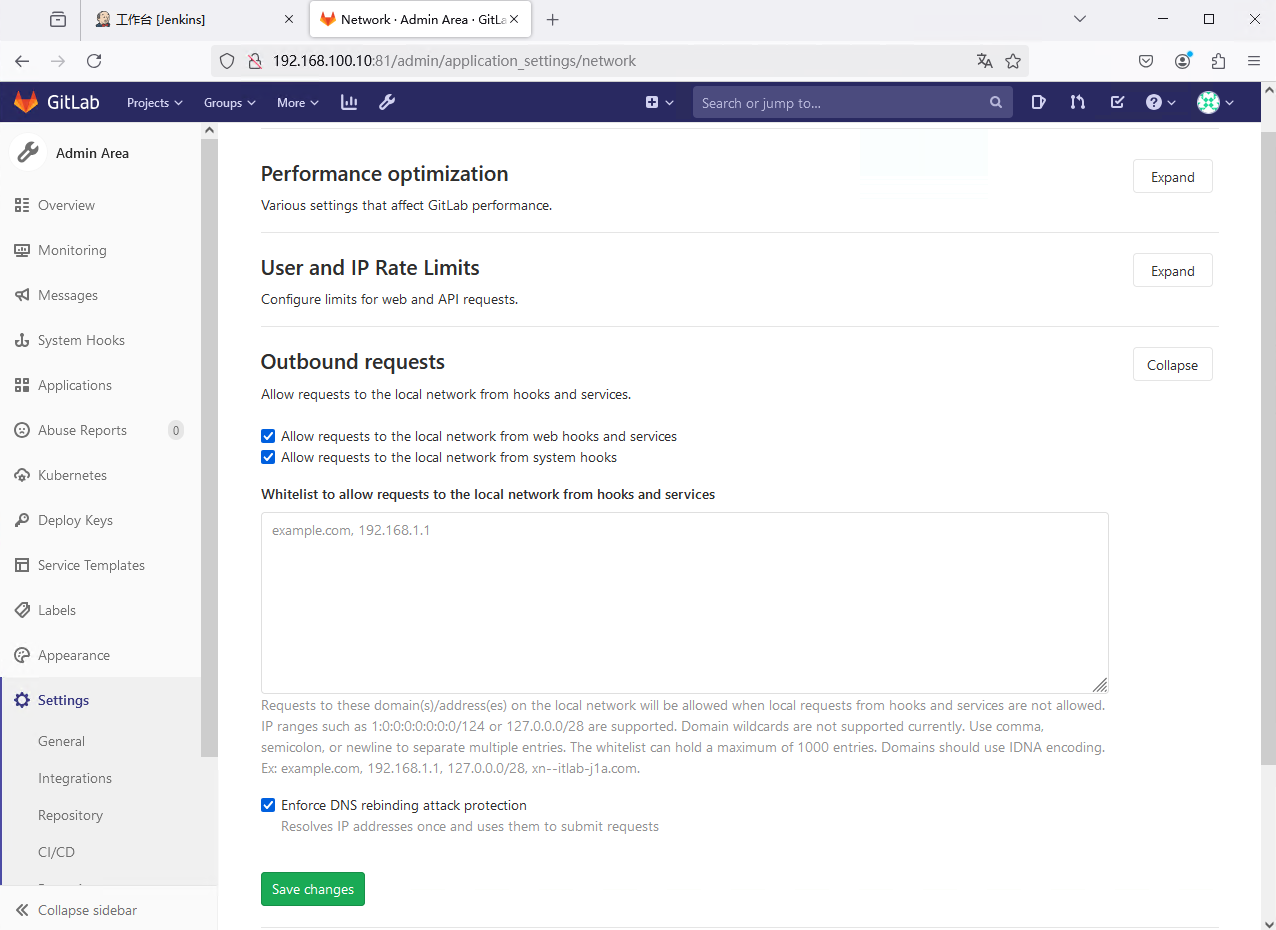
3. 配置 Jenkins 连接 GitLab 3.1 设置 Outbound requests(出站请求) 登录 GitLab,打开 Dashboard,然后点击 🔧(settings)
然后点击 “Settings” → “Network” → “Outbound requests”(出战请求) 旁边的 Expand(展开)
然后勾选 “Allow requests to the local network from web hooks and services”
在下面的输入栏里面输入 192.168.100.0/24
然后点击 “Save change”(保存设置)
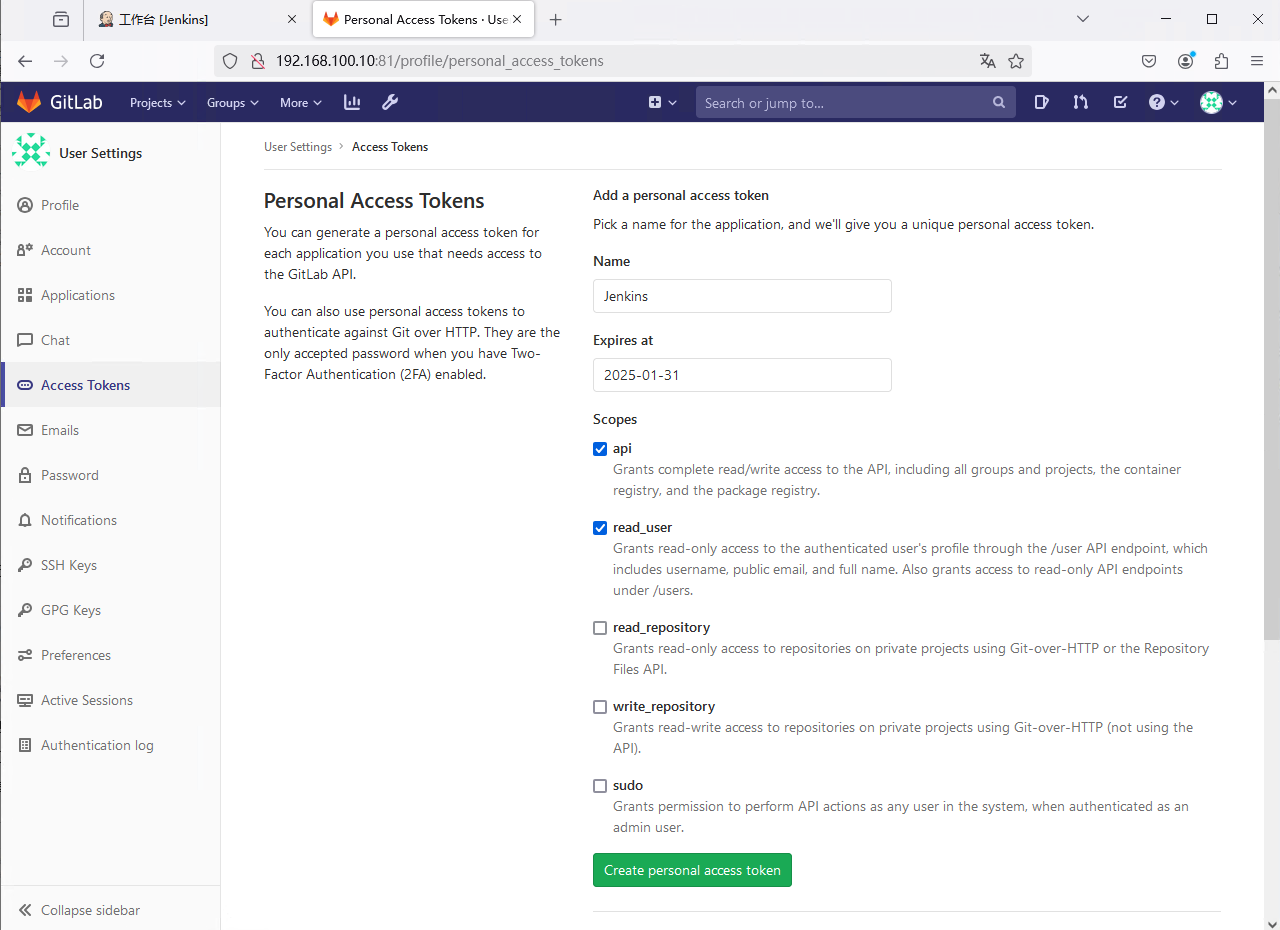
3.2 创建 Github API Token 点击 GitLab 的用户头像,然后点击 “Settings” → “Access Token” 添加一个 Token
在 Scopes(范围) 上选上 “api” 和 “read_user”,其他的和上面一样,随便填一个就行,然后点击 “Create personal access token”(创建个人访问令牌)
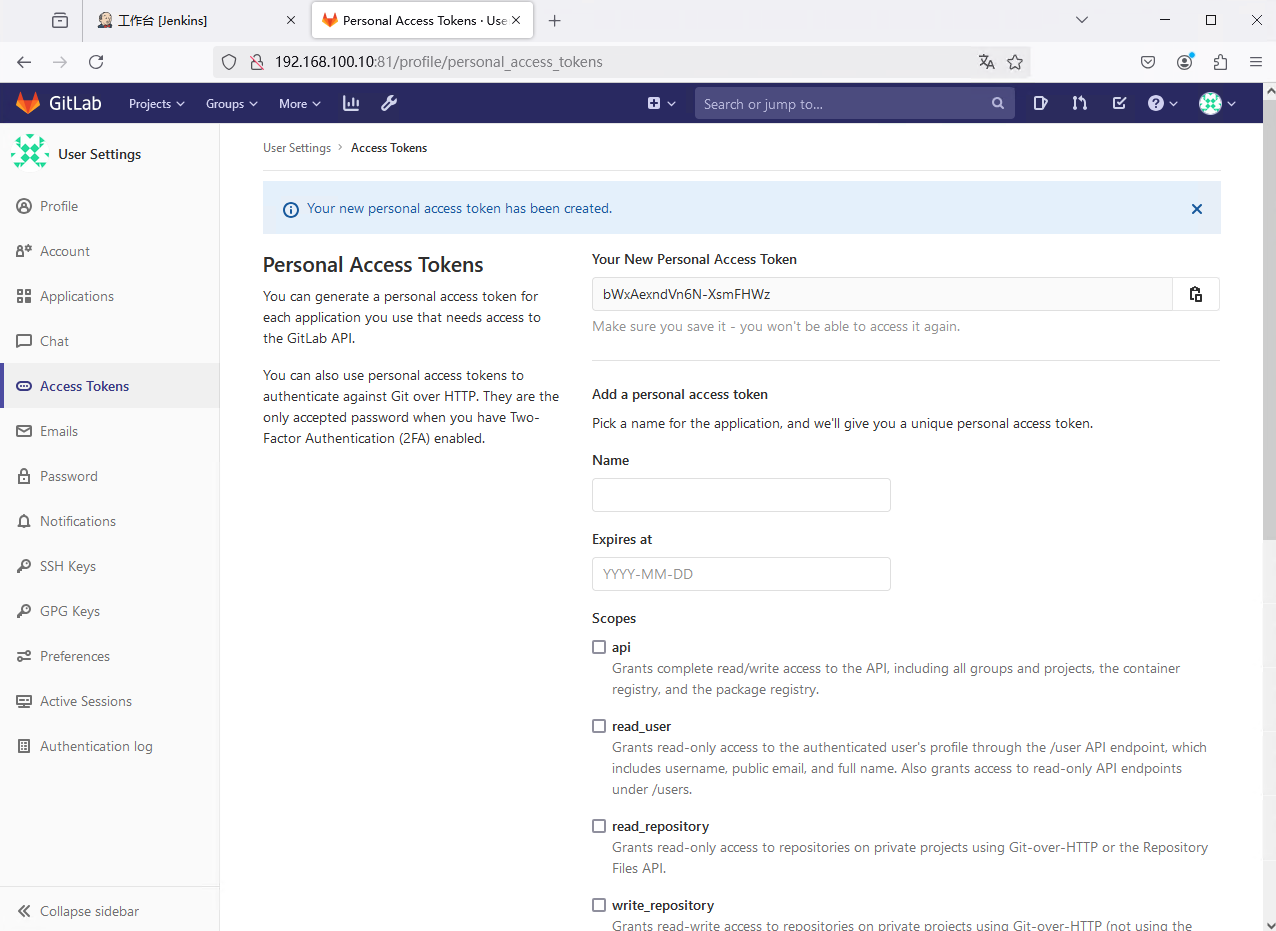
然后复制 “Your New Personal Access Token”(你的新个人访问令牌) 栏里面的内容,后面配置 Jenkins 的时候需要用到
3.3 设置 Jenkins 登录 Jenkins Dashboard,然后点击 “Manage Jenkins”(管理 Jenkins/系统管理) → “Plugins”(插件) → “Installed plugins”(已安装插件) 查看有没有以下插件
“GitLab”
“Generic Webhook Trigger”
“GitLab API”
“GitLab Authentication”
“GitLab Branch Source”
“Gitlab Merge Request Builder”
“GitLab Logo”
如果没有的话就到 “Available plugins”(可用插件) 去安装一下
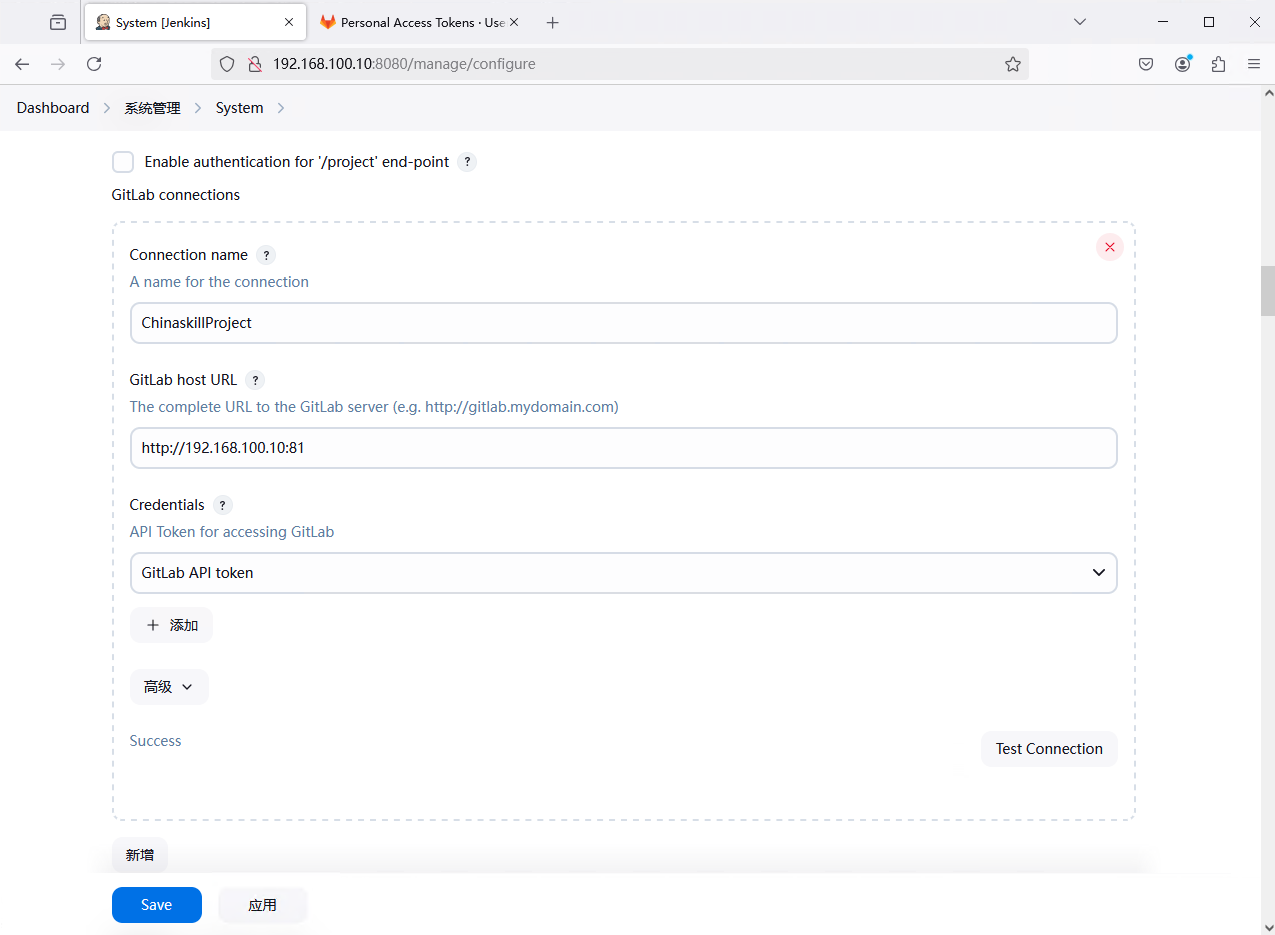
然后回到 Jenkins Dashboard,点击 “Manage Jenkins”(管理 Jenkins/系统管理) → “System”(系统配置)
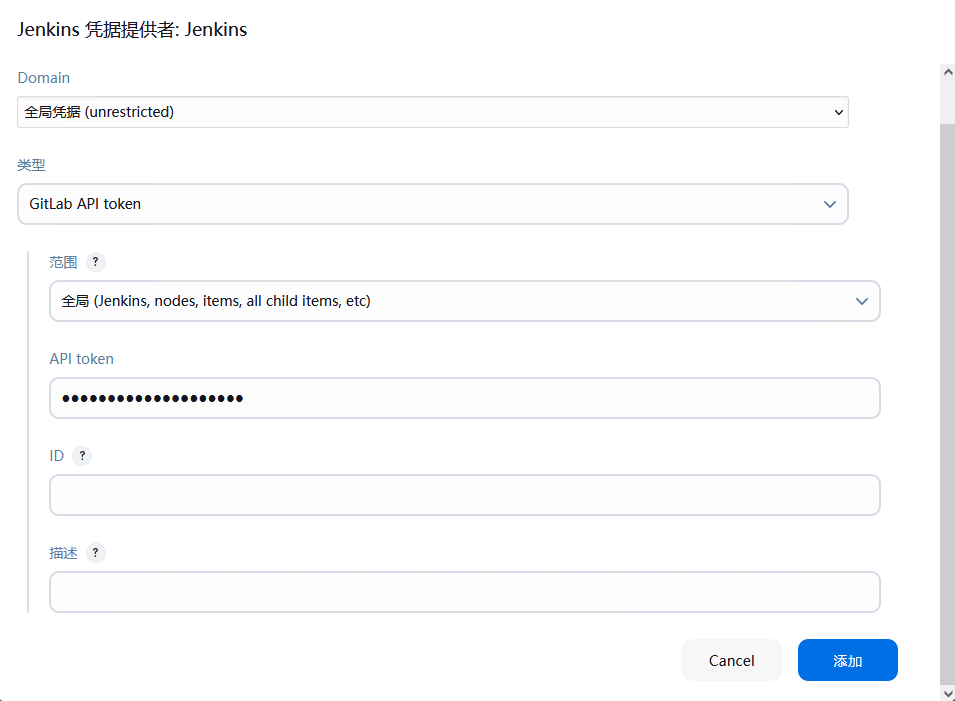
然后配置 GitLab 信息,取消勾选 “Enable authentication for ‘/project’ end-point” 然后在 “Credentials” 下面点击 “添加”
然后在 类型 里面选择 “GitLab API token”,”API token” 填入刚刚复制的 token
然后点击 “Test Connection”(测试连接)
4. 配置 Jenkins 连接 maven 4.1 安装 maven 由于我们这里的 Jenkins 是采用 Docker in Docker 的方式启动的,所以需要在 Jenkins 容器内安装 maven
1 2 3 4 5 6 7 8 9 10 11 12 13 14 15 16 17 18 19 20 21 22 23 24 exec -it jenkins /bin/bashmv apache-maven-3.6.3/ /usr/local/mavenexport M2_HOME=/usr/local/mavenexport PATH=$PATH :$M2_HOME /binsource ~/.bashrcexit exec -it jenkins /bin/bash"linux" , version: "3.10.0-1160.71.1.el7.x86_64" , arch : "amd64" , family: "unix"
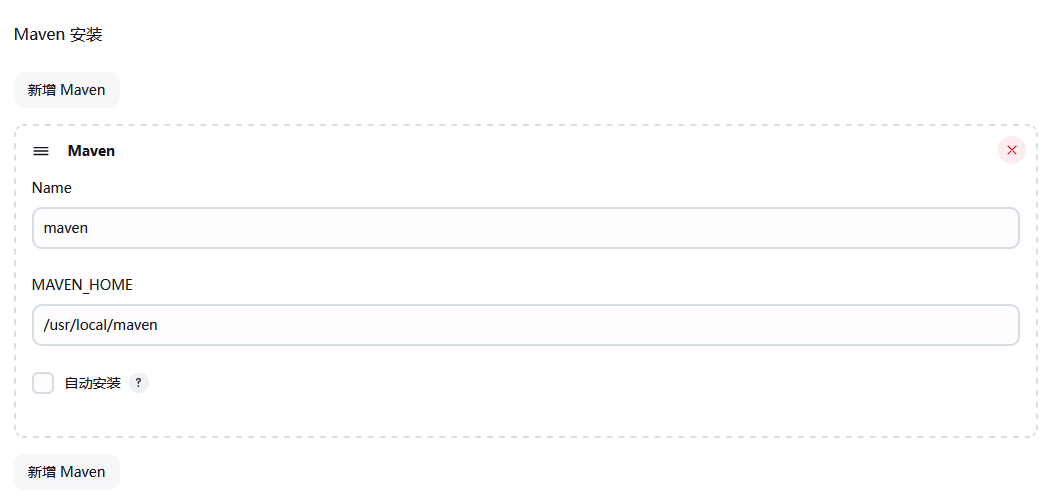
4.2 连接 maven 登录 Jenkins,点击 “Manage Jenkins”(管理 Jenkins/系统管理) → “Tools”(工具/全局系统配置)
往下翻找到 Maven,点击“新增Maven”,此处不要开启自动安装,所以不要勾选“自动安装”
然后把填入 Maven 路径填入 MAVEN_HOME ,应用保存即可
5. 部署 Harbor 仓库 5.1 安装 Harbor 仓库 Harbor 依赖 Docker 和 Docker Compose。因此,首先需要在系统中安装 Docker Compose
1 2 3 4 5 $ DOCKER_CONFIG=/usr/local/lib/docker/cli-pluginssudo mkdir -p $DOCKER_CONFIG /cli-pluginssudo curl -SL https://github.com/docker/compose/releases/download/v2.29.1/docker-compose-linux-x86_64 -o $DOCKER_CONFIG /cli-plugins/docker-composesudo chmod +x $DOCKER_CONFIG /cli-plugins
然后下载 Offline 版的 Harbor
1 2 3 4 5 6 7 $ sudo curl -O https://github.com/goharbor/harbor/releases/download/v2.12.1/harbor-offline-installer-v2.12.1.tgzsudo curl -O https://moka.anitsuri.top/images/Registry+Harbor/harbor-offline-installer-v2.11.1.tgzsudo tar -zxf harbor-offline-installer-v2.12.1.tgzcd harbor
然后修改配置文件,把 harbor.yml.tmpl 复制一个变成 harbor.yml
1
2
$ sudo cp harbor.yml.tmpl harbor.ymlsudo vi harbor.yml
修改/填写以下内容
1 2 3 4 5 6 7 8 9 10 11 12 13 14 15 16 17 18 19 20 21 22 23 24 25 26 27 28 29 30 31 32 33 34 35 36 37 38 39 40 41 42 43 44 45 46 47 hostname: 192.168 .100 .10 http: port: 80 harbor_admin_password: Harbor12345
在运行安装脚本前,需要先运行 prepare 脚本,来确保一切依赖和配置都已经就绪
1 2 3 4 5 6 7 8 9 10 11 12 13 14 15 16 17 18 19 20 21 22 23 24 25 26 27 28 29 30 31 32 33 34 35 36 37 38 39 40 41 42 43 44 45 46 47 48 49 50 51 52 53 54 55 56 57 58 59 60 61 62 63 64 65 66 67 68 69 70 71 72 73 74 75 76 77 78 79 80 81 82 83 84 85 86 87 88 89 90 91 92 93 94 95 96 97 98 99 100 101 102 103 104 105 106 107 108 109 110 111 112 113 114 115 116 117 118 119 120 121 122 123 124 125 126 127 128 129 130 131 132 133 134 135 136 137 138 139 140 141 142 143 144 145 146 147 148 149 150 151 152 153 154 155 156 157 158 159 160 161 162 163 164 165 166 167 168 169 170 171 172 $ ./preparedir is set to /root/harbor'goharbor/prepare:v2.12.1' locallyfor goharbor/prepare:v2.12.1in the future. Please make sure to upgrade to httpsdir if docker is installed ...dir is set to /root/harborin the future. Please make sure to upgrade to httpsdir
5.2 配置 Harbor 到 Docker Daemon 文件 在两台机器上,编辑 /etc/docker/daemon.json 文件,把以下内容复制/添加进去
1 2 3 4 5 { "insecure-registries" : [ "192.168.100.10" ] }
然后重新加载 daemon 并重新启动 Docker
1 2 $ sudo systemctl daemon-reloadsudo systemctl restart docker
然后耐心等待 Jenkins 和 GitLab 的容器恢复
5.3 关闭 containerd 的 HTTPS 请求 编辑 /etc/containerd/config.toml 文件,修改或添加以下内容
1 2 [plugins."io.containerd.grpc.v1.cri".registry.mirrors."192.168.100.10"] endpoint = ["http://192.168.100.10" ]
然后重启 containerd 服务
1 $ sudo systemctl restart containerd
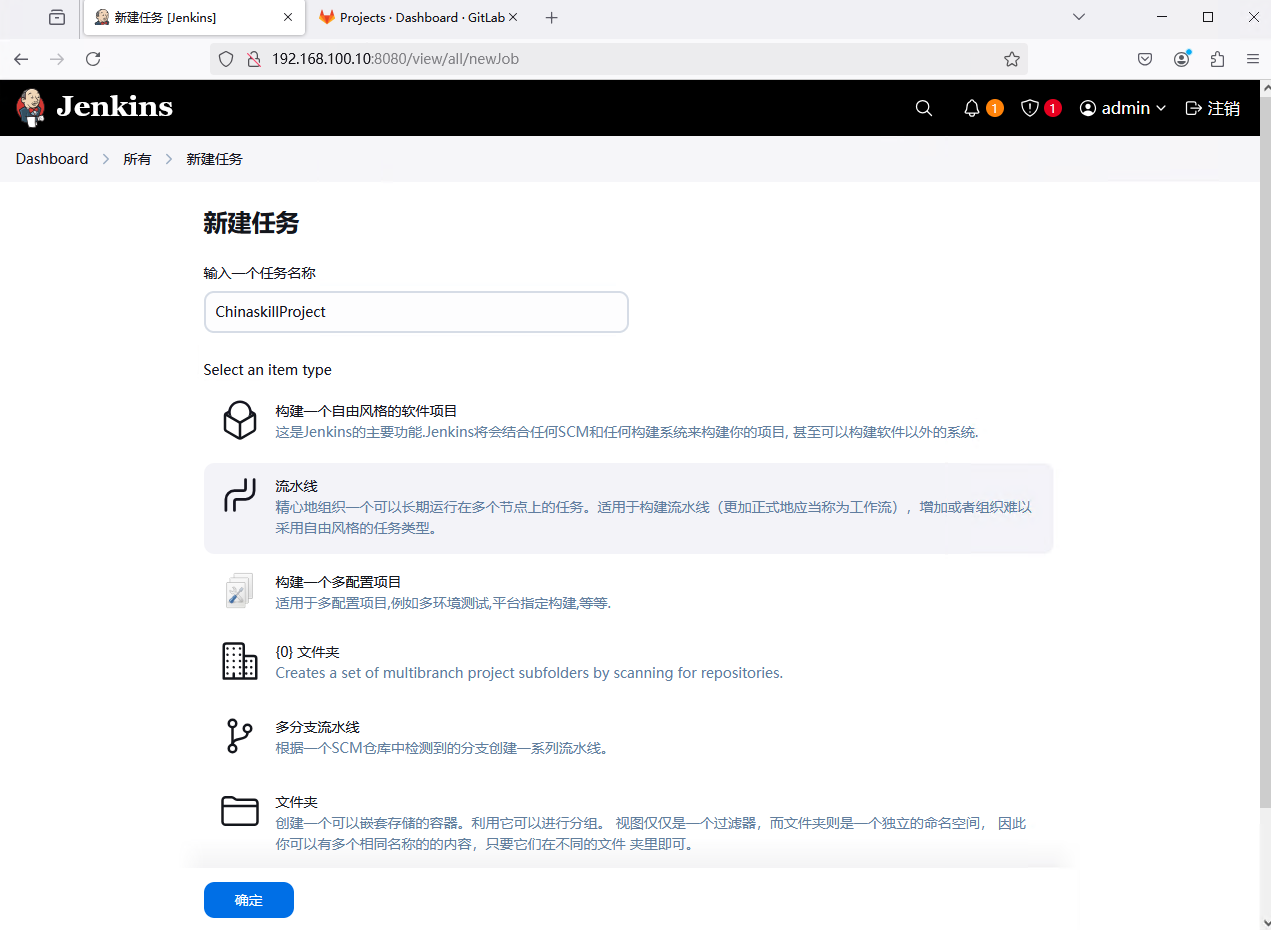
6. 配置 CI/CD 6.1 新建任务 登录 Jenkins Dashboard,点击 “新建Item”(新建任务),选择构建一个流水线,然后 “确定”
然后在 “构建触发器” 一栏,勾选 “Build when a change is pushed to GitLab. GitLab webhook URL: http://192.168.100.10:8080/project/ChinaskillProject “
记录下 GitLab Webhook URL的地址(http://192.168.100.10:8080/project/ChinaskillProject),后期配置 Webhook 需要使用
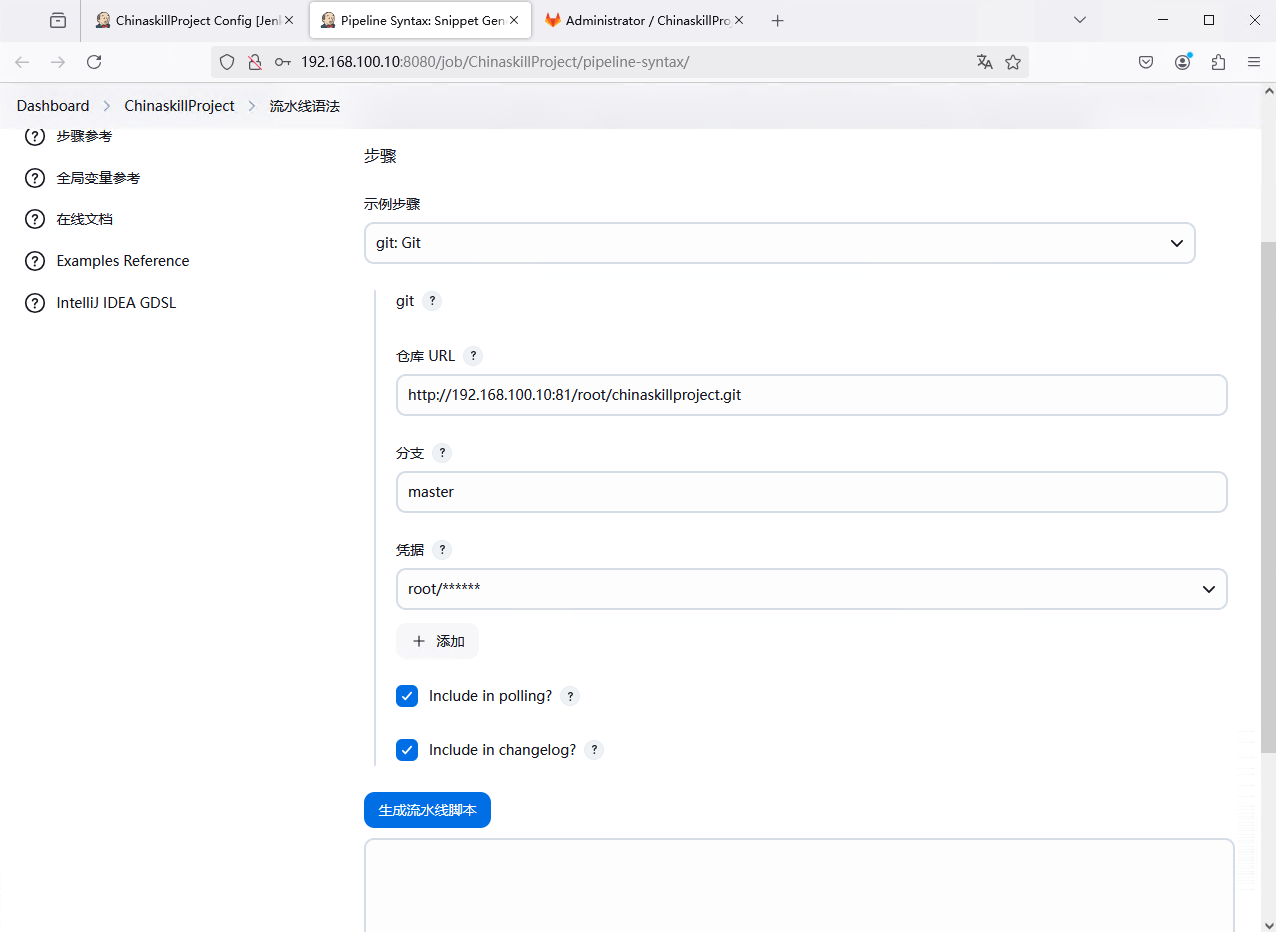
然后配置下方 “流水线”,然后点击下面的 “流水线语法”:“示例步骤” 选择 “git:Git”,将 springcloud 项目的 GitLab 地址填入“仓库 URL”
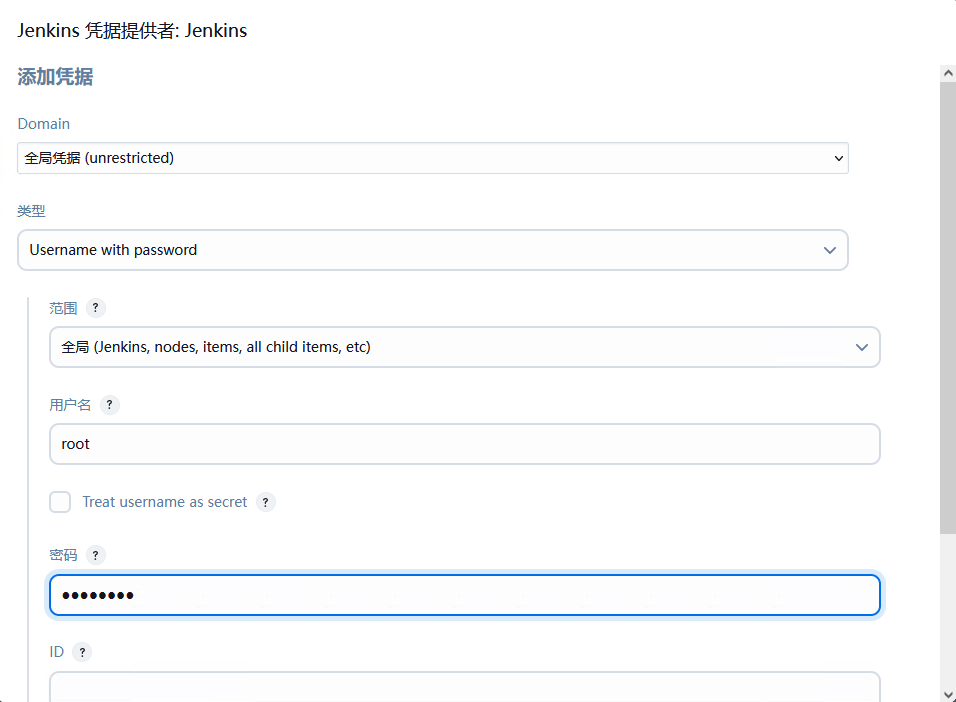
然后点一下 “凭据” 旁边的 “添加” 按钮,选择 “Jenkins”,类型选择 “Username with password”,用户名和密码为 GitLab 仓库的用户名和密码
添加凭据之后选择凭据,最后是这样的
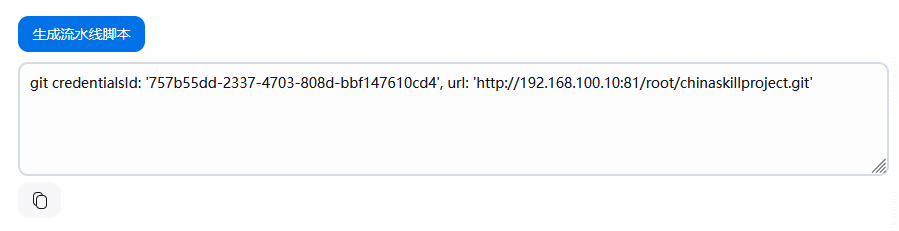
然后点击 “生成流水线脚本”
然后记录生成的值
1 git credentialsId: '757b55dd-2337-4703-808d-bbf147610cd4', url: 'http://192.168.100.10:81/root/chinaskillproject.git'
将其写入下面的流水线脚本里面
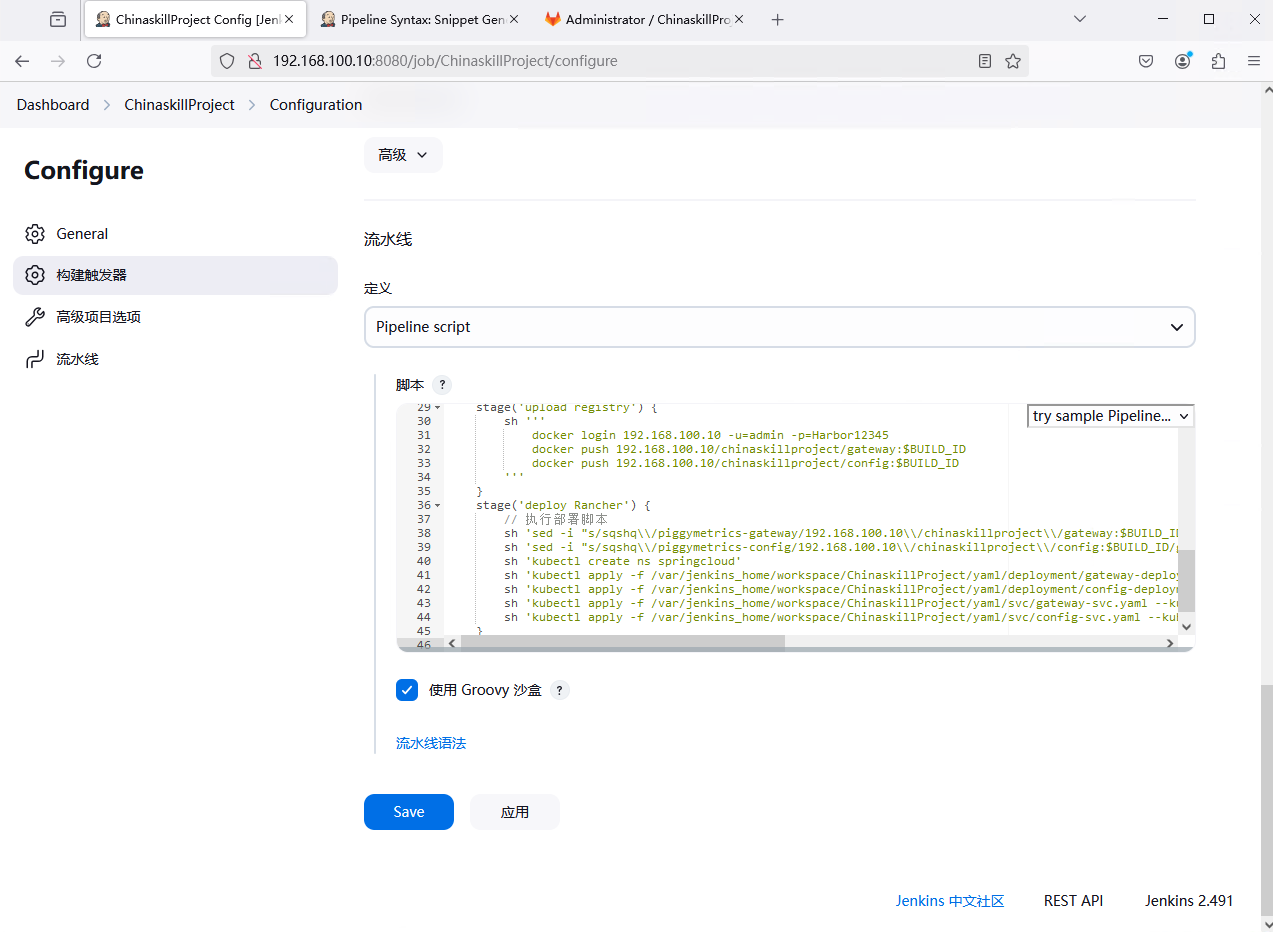
这里是完整的流水线脚本
1 2 3 4 5 6 7 8 9 10 11 12 13 14 15 16 17 18 19 20 21 22 23 24 25 26 27 28 29 30 31 32 33 34 35 36 37 38 39 40 41 42 43 44 45 46 node {'git clone' ) {credentialsId: '757b55dd-2337-4703-808d-bbf147610cd4' , url: 'http://192.168.100.10:81/root/chinaskillproject.git' 'maven build' ) {'''/usr/local/maven/bin/mvn package -DskipTests -f /var/jenkins_home/workspace/ChinaskillProject''' 'image build' ) {''' echo $BUILD_ID docker build -t 192.168.100.10/chinaskillproject/gateway:$BUILD_ID -f /var/jenkins_home/workspace/ChinaskillProject/gateway/Dockerfile /var/jenkins_home/workspace/ChinaskillProject/gateway docker build -t 192.168.100.10/chinaskillproject/config:$BUILD_ID -f /var/jenkins_home/workspace/ChinaskillProject/config/Dockerfile /var/jenkins_home/workspace/ChinaskillProject/config ''' 'test' ) {''' docker run -itd --name gateway 192.168.100.10/chinaskillproject/gateway:$BUILD_ID docker ps -a | grep chinaskillproject | grep Up if [ $? -eq 0 ]; then echo "Success!" docker rm -f gateway else docker rm -f gateway exit 1 fi ''' 'upload registry' ) {''' docker login 192.168.100.10 -u=admin -p=Harbor12345 docker push 192.168.100.10/chinaskillproject/gateway:$BUILD_ID docker push 192.168.100.10/chinaskillproject/config:$BUILD_ID ''' 'deploy Rancher' ) {'sed -i "s/sqshq\\/piggymetrics-gateway/192.168.100.10\\/chinaskillproject\\/gateway:$BUILD_ID/g" /var/jenkins_home/workspace/ChinaskillProject/yaml/deployment/gateway-deployment.yaml' 'sed -i "s/sqshq\\/piggymetrics-config/192.168.100.10\\/chinaskillproject\\/config:$BUILD_ID/g" /var/jenkins_home/workspace/ChinaskillProject/yaml/deployment/config-deployment.yaml' 'kubectl create ns springcloud' 'kubectl apply -f /var/jenkins_home/workspace/ChinaskillProject/yaml/deployment/gateway-deployment.yaml --kubeconfig=/root/.kube/config' 'kubectl apply -f /var/jenkins_home/workspace/ChinaskillProject/yaml/deployment/config-deployment.yaml --kubeconfig=/root/.kube/config' 'kubectl apply -f /var/jenkins_home/workspace/ChinaskillProject/yaml/svc/gateway-svc.yaml --kubeconfig=/root/.kube/config' 'kubectl apply -f /var/jenkins_home/workspace/ChinaskillProject/yaml/svc/config-svc.yaml --kubeconfig=/root/.kube/config'
在 “脚本” 一栏里写入脚本之后即可点击 “Save” 或者是 “应用”
6.2 开启 Jenkins 匿名访问 登录 Jenkins Dashboard ,点击 “Manage Jenkins”(管理 Jenkins/系统管理) → “Security”(安全/全局安全配置),然后配置授权策略允许匿名用户访问
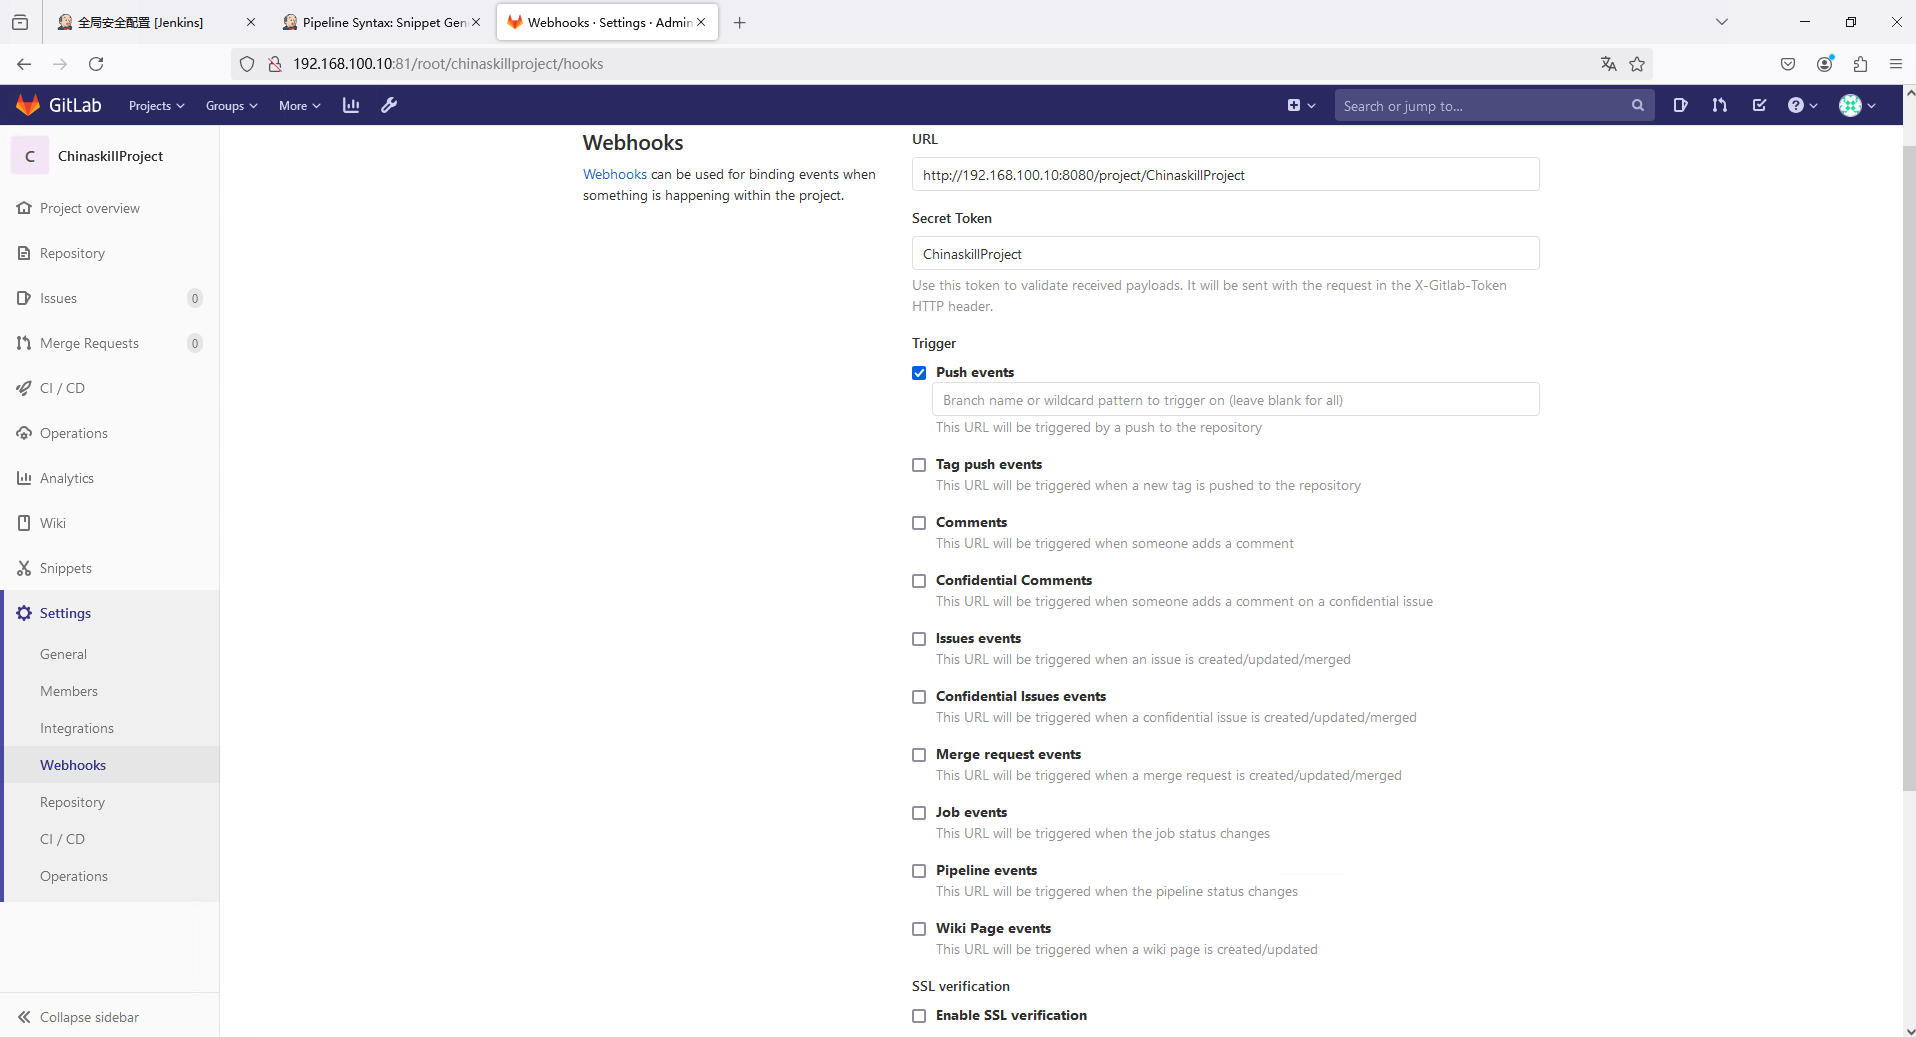
6.3 配置 Webhook 登录 GitLab,进入 “ChinaskillProject” 项目
点击 “Settings” → “Webhooks”,将前面记录的 GitLab Webhook URL 地址填入 URL 处,并禁用 SSL 认证
点击 “Add webhook” 添加 Webhook
然后点击 “Test”(测试) → “Push events”(推送活动) 进行测试
结果返回 HTTP 200 则表明 Webhook 配置成功
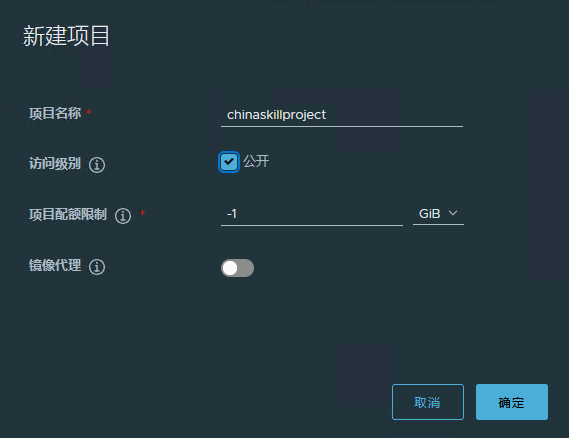
6.4 创建仓库项目 登录 Harbor,新建项目 chinaskillproject,访问级别设置为 “公开”
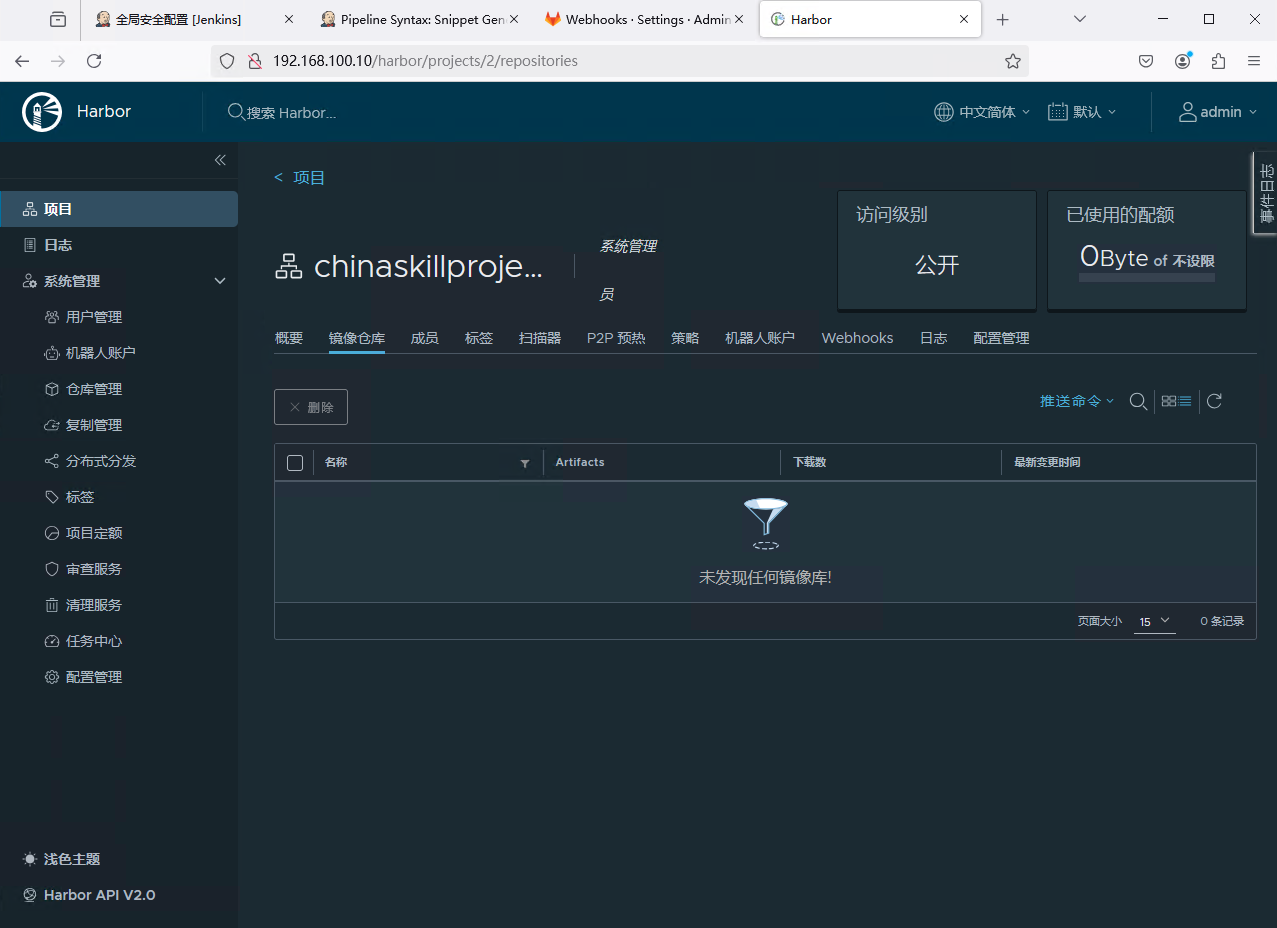
进入项目查看镜像列表,可以看到此时为空,无任何镜像
三、正式构建 触发 CI/CD 注意 在此之前,需要把 XianDian-PaaS-v2.4.iso 里面的 ./ChinaskillProject 项目下所有目录里面的 Dockerfile 的 java:8-jre 全都改成 openjdk:8-jre,然后重新上传 GitLab 仓库,否则会导致构建失败
1. 触发构建 回到 GitLab 上的 “ChinaskillProject” 项目,点击 “Settings” → “Webhooks” 往下翻找到 “Test”(测试) 然后点击 “Push events”(推送活动) 即可正常构建
或者你也可以上传代码,来自动触发构建
1 2 3 4 5 6 7 8 9 10 11 12 13 14 15 $ docker cp /opt/repository/ jenkins:/root/.m2/cd /opt/ChinaskillProject/"Initial commit" for 'http://192.168.100.10:81' : rootfor 'http://[email protected] :81' : done .done .done .done .
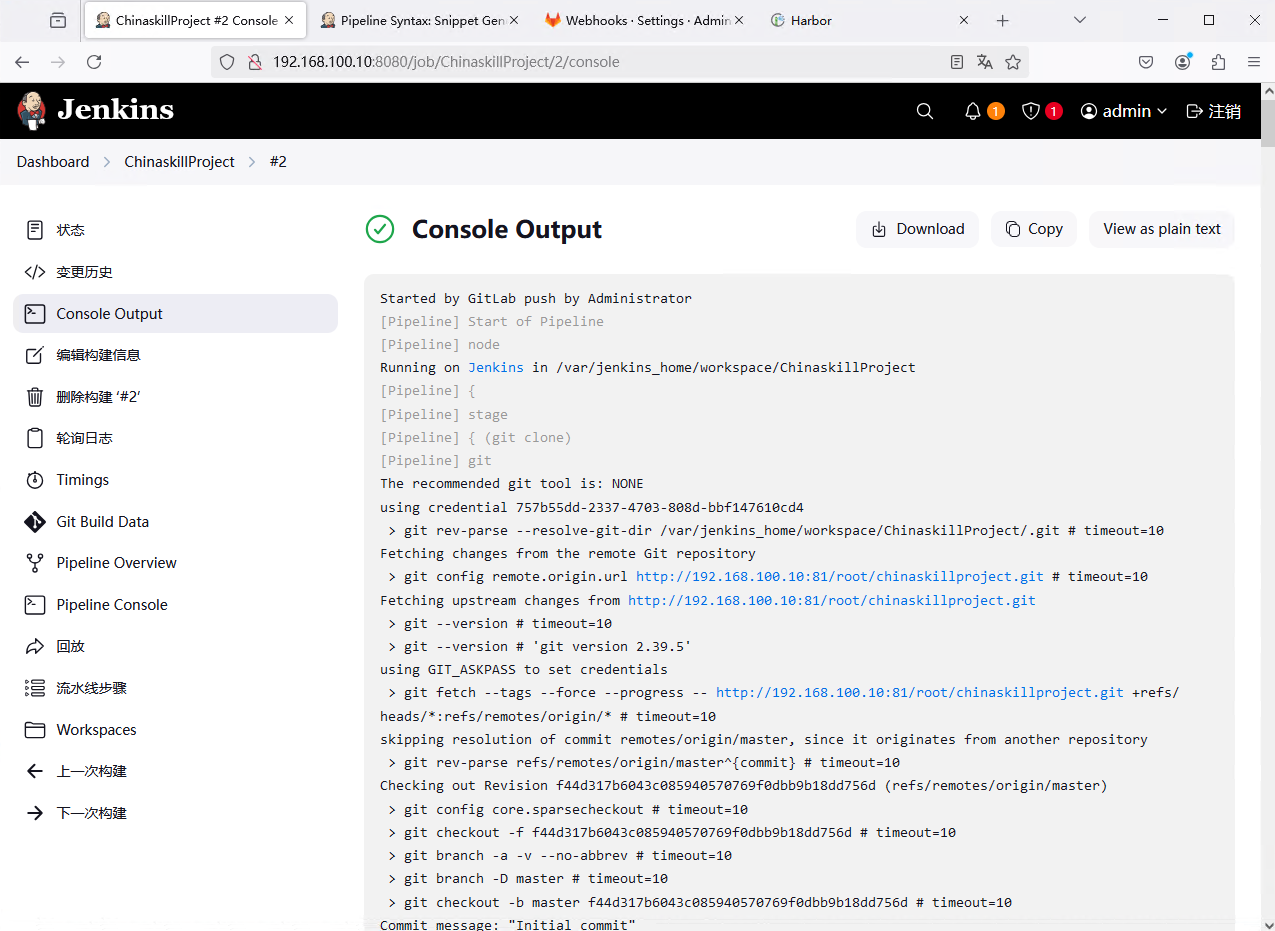
2. Jenkins 查看 登录 Jenkins Dashboard,可以看到 ChinaskillProject 项目已经开始构建
点击项目名称查看流水线阶段视图,点击左边最新的#(我这边是#2)里面的 “Console Output”(控制台输出) 可以看到详细的构建进程
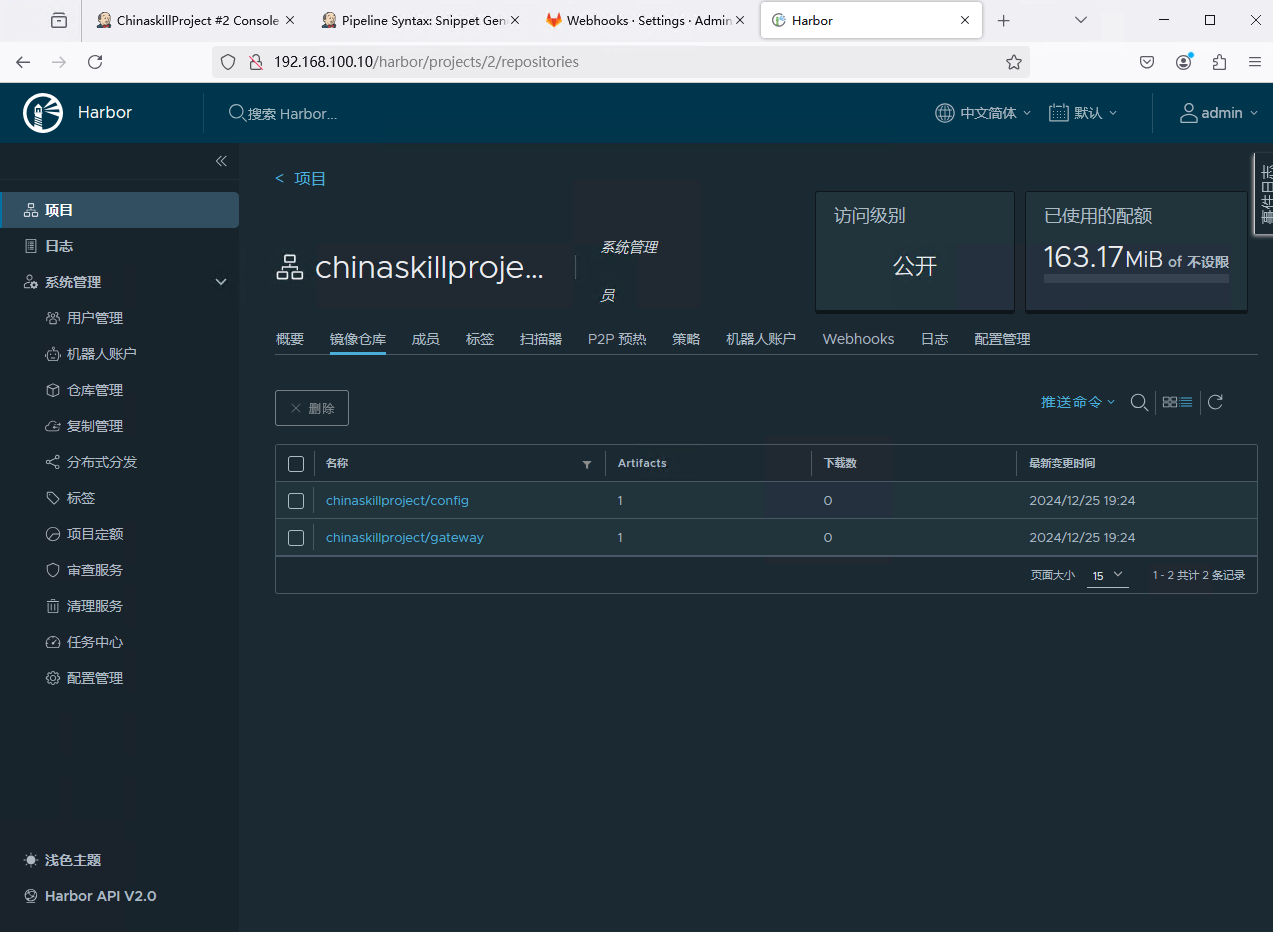
3. Harbor 查看 进入 Harbor 仓库 chinaskillproject 项目查看镜像列表,可以看到已经自动上传了一个 gateway 和 config 镜像
4. Kubernertes 查看 Pod 的启动比较慢,需要等待 3~5 分钟,具体的时间需要看你分配的配置
我们可以在命令行查看 Pod
1 2 3 4 $ kubectl -n springcloud get pods
查看 Service
1 2 3 4 $ kubectl -n springcloud get service
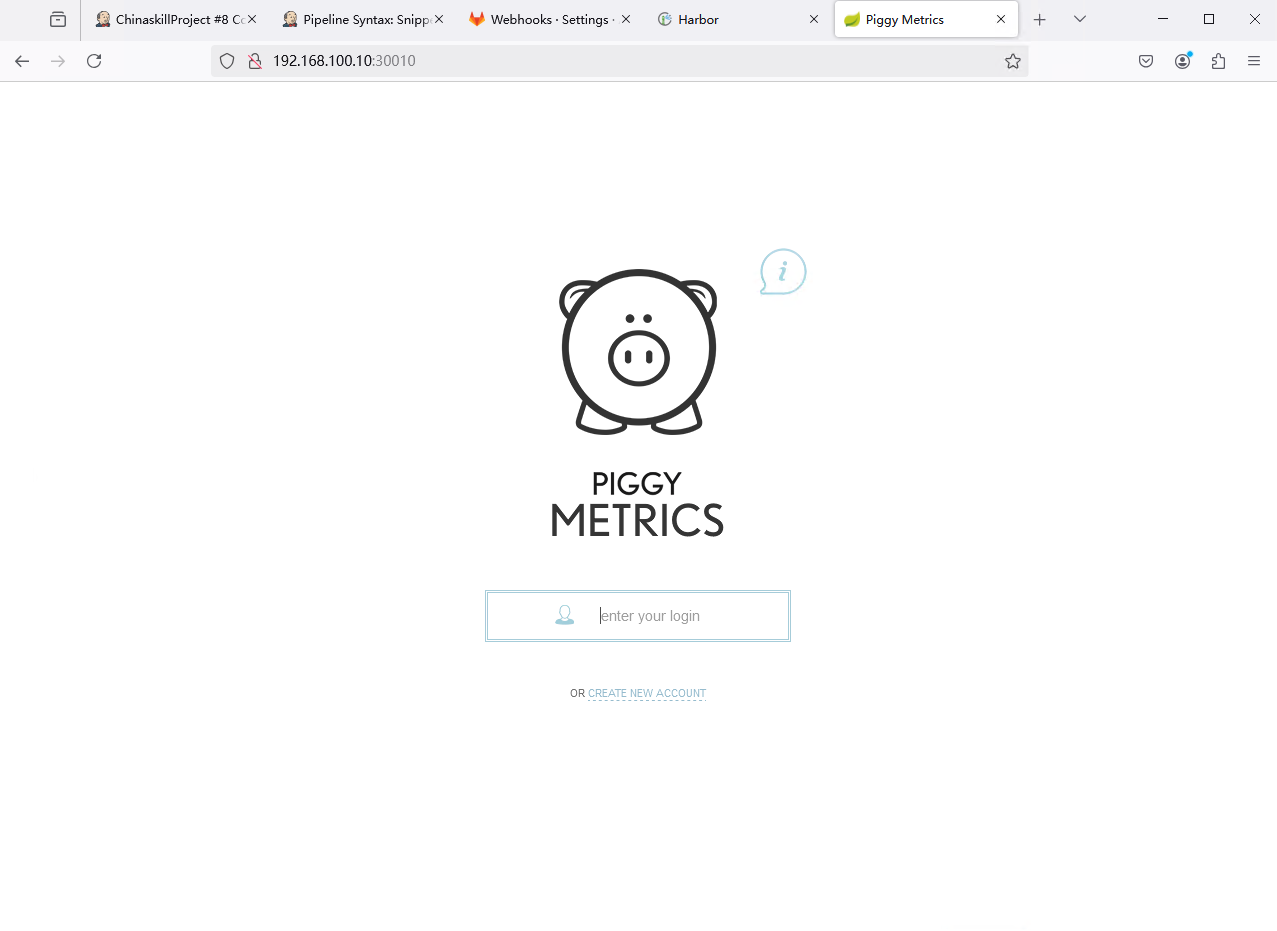
然后访问 http://192.168.100.10:30010 访问服务