Web 集群架构应用
分布式集群商城应用系统部署
一、介绍
1. 什么是集群应用系统
集群应用系统(Cluster Application System)是指由多台独立的计算机通过网络连接组成的一个系统,这些计算机协同工作以完成特定任务。集群系统的主要目的是提高系统的性能、可靠性和可扩展性。
集群通过协同工作,可以实现数据的高并发、更稳定、高可用、时效性及鲁棒性的目标。具体来说,当多个节点同时处理同一任务时,可以显著提高系统的整体性能。同时,当某个节点发生故障时,其他节点可以接管其任务,保证了系统的稳定性和可用性。此外,集群还能通过负载均衡等技术实现资源的合理分配,进一步提高系统的整体性能和鲁棒性。
集群应用系统广泛应用于各种领域,包括互联网服务、数据库管理、科学研究和企业应用等。
2. 架构演变过程解析
单体架构到分布式架构
在一开始,我们使用单节点部署gpmall,那个单体架构,单体架构的特点是所有功能模块(例如用户管理、订单处理、商品展示、支付系统等)全部集成到一个应用程序中。这种架构适合初期系统开发,部署简单,适合小规模的项目
然而,随着业务的增长,单体架构逐渐暴露出一些问题:
- 可维护性差:随着业务的扩展,代码量增大,单个应用变得很复杂,维护难度增加
- 扩展能力有限:单台机器性能有极限,不能扩展太多,任何一部分需要扩展或修改时,必须重新部署整个应用
- 不稳定:一损俱损,一个服务使得系统宕机了,所有服务都用不了
为了解决这些问题,我们转变到了分布式架构
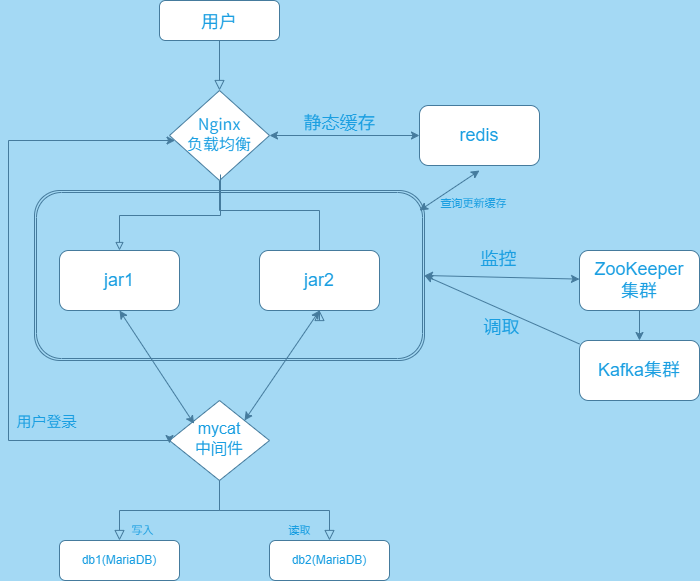
在分布式架构下,系统的组件会包括:
- Nginx:用于分发流量,确保各个服务的负载均衡(nginx 服务器)
- 数据库和缓存服务:数据库主从架构、读写分离,以及 Redis 缓存等,确保数据的高可用性和高性能(mycat、db1、db2 和 redis 服务器)
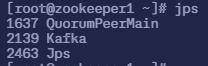
- 消息队列:通过消息队列 Kafka 实现服务之间的异步通信,减轻服务间的耦合度(zookeeper1、zookeeper2、zookeeper3 服务器)
- 后端服务:两台 jar1、jar2 服务器实现后端服务的负载均衡
二、实际部署
| IP | 主机名 | 节点 |
|---|---|---|
| 192.168.104.130 | mycat | mycat 中间件服务节点 |
| 192.168.104.131 | db1 | MariaDB 数据库集群主节点 |
| 192.168.104.132 | db2 | MariaDB 数据库集群从节点 |
| 192.168.104.133 | zookeeper1 | 集群节点 |
| 192.168.104.134 | zookeeper2 | 集群节点 |
| 192.168.104.135 | zookeeper3 | 集群节点 |
| 192.168.104.136 | redis | 消息队列服务节点 |
| 192.168.104.137 | jar1 | Tomcat1 节点 |
| 192.168.104.138 | jar2 | Tomcat2 节点 |
| 192.168.104.139 | nginx | nginx服务器 |
1. 基础配置
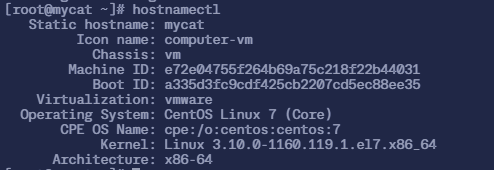
1.1 修改主机名
1 | |
同理 db1 db2 zookeeper1 zookeeper2 zookeeper3 redis jar1 jar2 也配置上
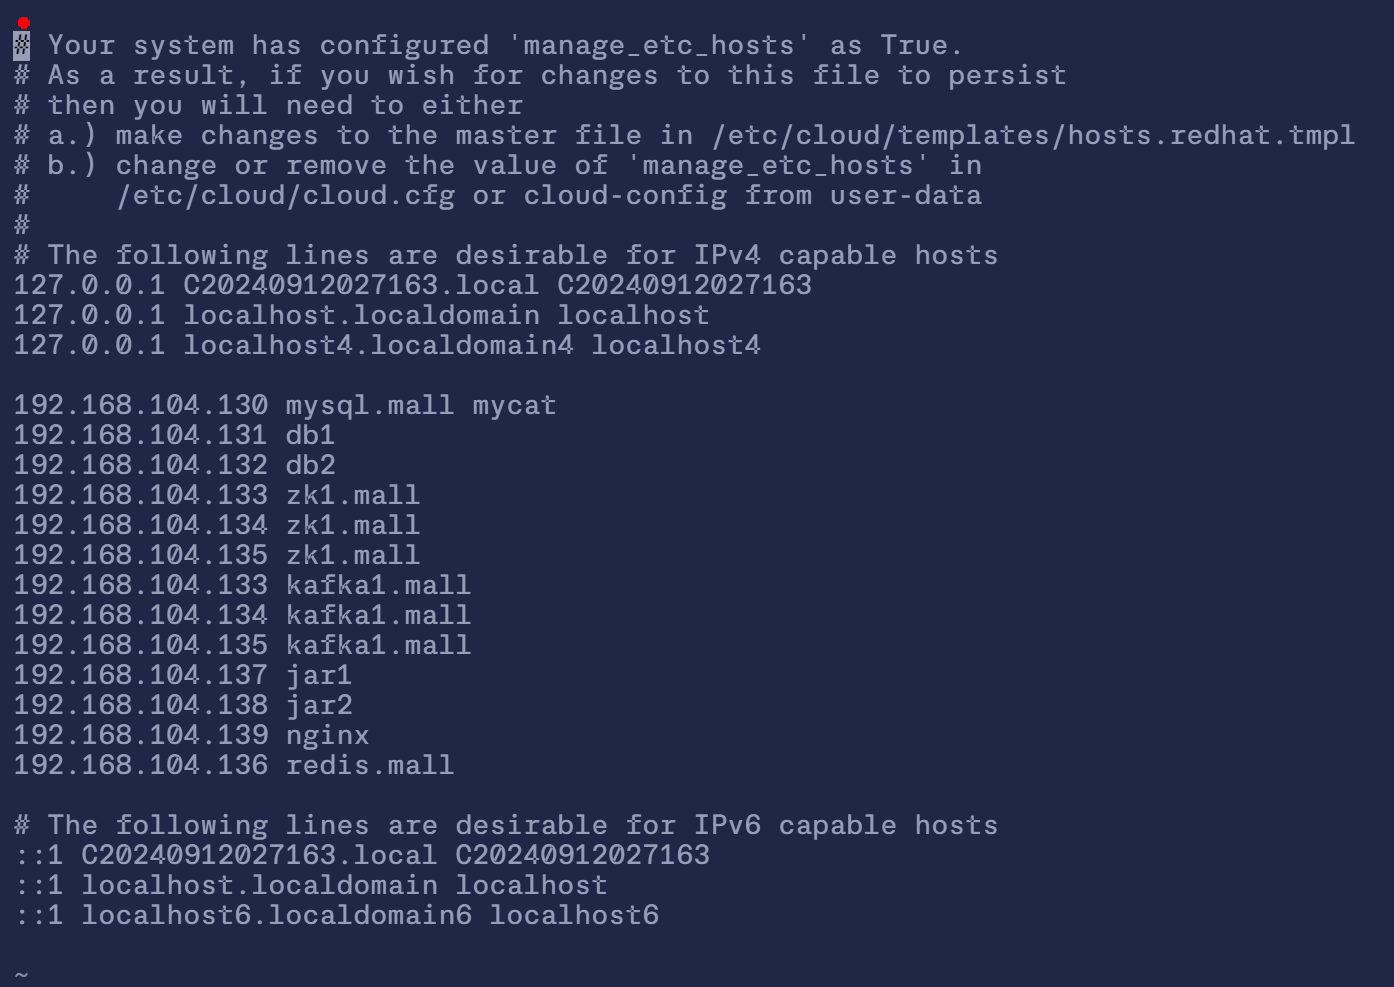
1.2 修改 hosts 文件
10 台机器都配置上以下内容
1 | |
1.3 配置 yum 源
使用提供的 gpmall-repo 文件上传至 10 个虚拟机的 /root 目录下,设置 阿里 yum 源 + 本地 yum 源
1 | |
1.4 安装 JDK 环境
在 mycat、zookeeper1、zookeeper2、zookeeper3、jar1、jar2 服务器上部署 JDK 1.8 版本
1 | |

1.5 安装数据库、Zookeeper 等服务
在 mycat 服务器上使用提供的 mycat 包 来安装 mycat 服务
1 | |

在 db1 和 db2 服务器上安装 MariaDB 服务
1 | |
在 zookeeper1、zookeeper2、zookeeper3 服务器上使用提供的 ZooKeeper 和 Kafka 包来安装 ZooKeeper 和 Kafka 服务
1 | |
在 Redis 服务器上安装 redis 服务
1 | |
在 Nginx 服务器上安装 nginx 服务
1 | |
2. 部署服务
2.1 部署 MariaDB 服务
2.1.1 初始化 MariaDB 服务
在 db1 和 db2 虚拟机上初始化 MariaDB 数据库,并设置 MariaDB 数据库 root 访问用户的密码为 123456
1 | |
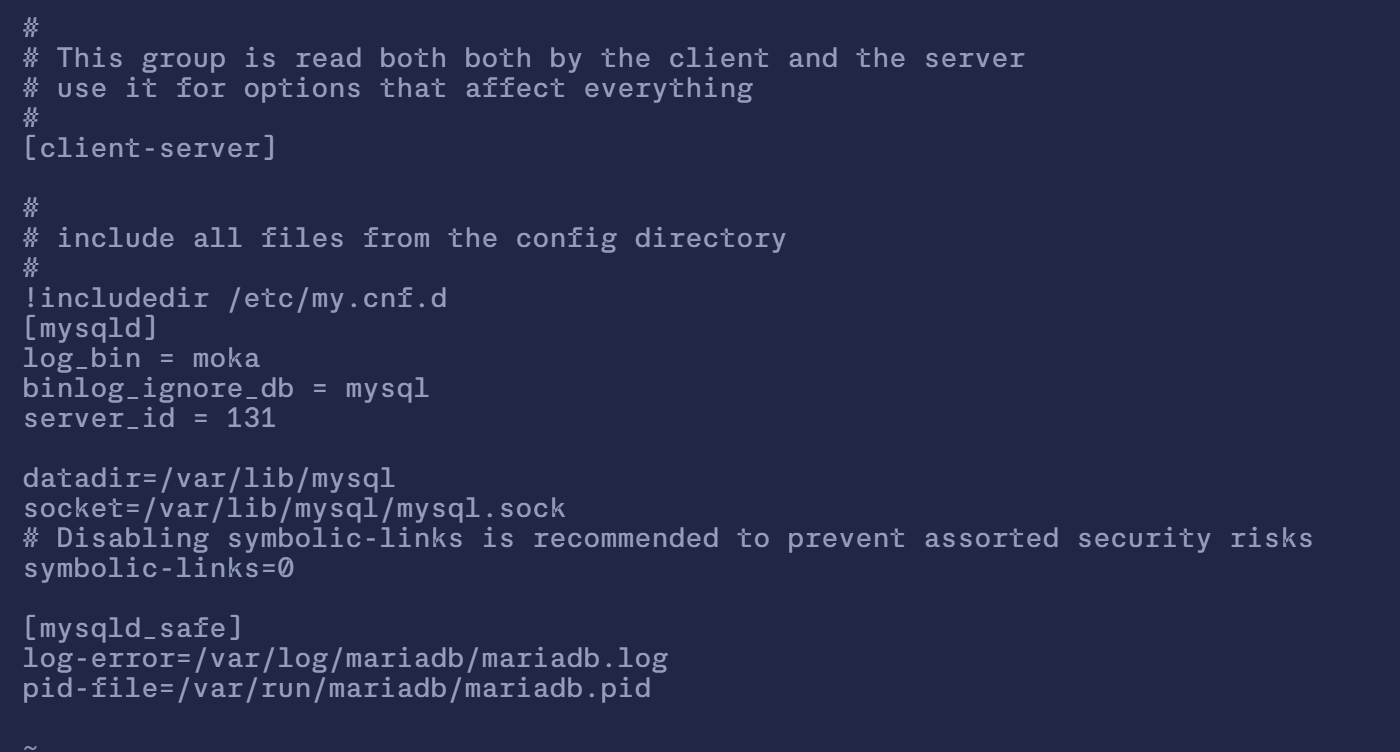
2.1.2 配置数据库集群主节点
编辑 db1 服务器的数据库配置文件 /etc/my.cnf
1 | |
- 配置解析:
log_bin = moka:启用二进制日志,并将其文件前缀设置为moka- 作用:二进制日志记录了所有修改数据库的数据操作,它用于数据库主从复制和数据恢复。启用该日志可以让从库读取并重放这些操作,以保持数据同步
binlog_ignore_db = mysql:忽略mysql数据库的二进制日志记录- 作用:该选项确保
mysql系统数据库的操作不会记录到二进制日志中
- 作用:该选项确保
server_id = 131:设置数据库服务器的唯一标识符- 作用:在主从复制环境中,每个服务器必须有一个唯一的
server_id,用于区分主库和从库以及防止数据循环,通常就是用这台服务器的主机号做server_id
- 作用:在主从复制环境中,每个服务器必须有一个唯一的
datadir=/var/lib/mysql:指定数据库的数据文件存储位置socket=/var/lib/mysql/mysql.sock:指定 MySQL 的 Unix Socket 文件路径- 作用:这用于本地连接到 MySQL 数据库,客户端通过该路径与数据库通信
symbolic-links=0:禁用符号链接。- 作用:出于安全考虑,建议禁用符号链接,以防止潜在的安全风险(例如目录遍历攻击)
log-error=/var/log/mariadb/mariadb.log:指定错误日志的存储路径[mysqld_safe] pid-file=/var/run/mariadb/mariadb.pid:定义mysqld_safe进程的 PID 文件路径
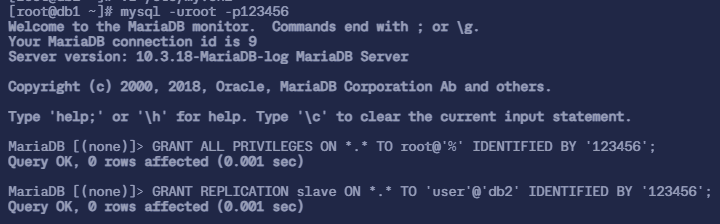
2.1.3 开放主节点的数据库权限
在主节点 db1 虚拟机上使用 mysql 命令登录 MariaDB 数据库
1 | |
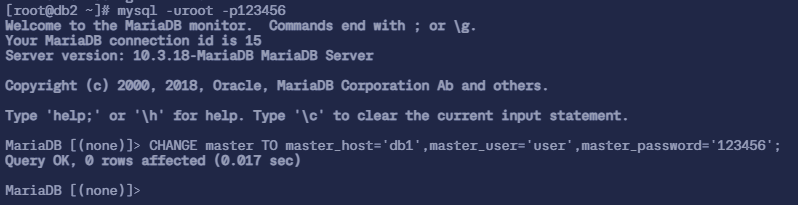
2.1.4 配置从节点 db2 同步主节点 db1
在 db2 上使用 mysql 命令 登录 MariaDB 数据库,配置从节点连接主节点的连接信息
master_host为主节点主机名db1,master_user则是在上一步中创建的用户user
1 | |
1 | |
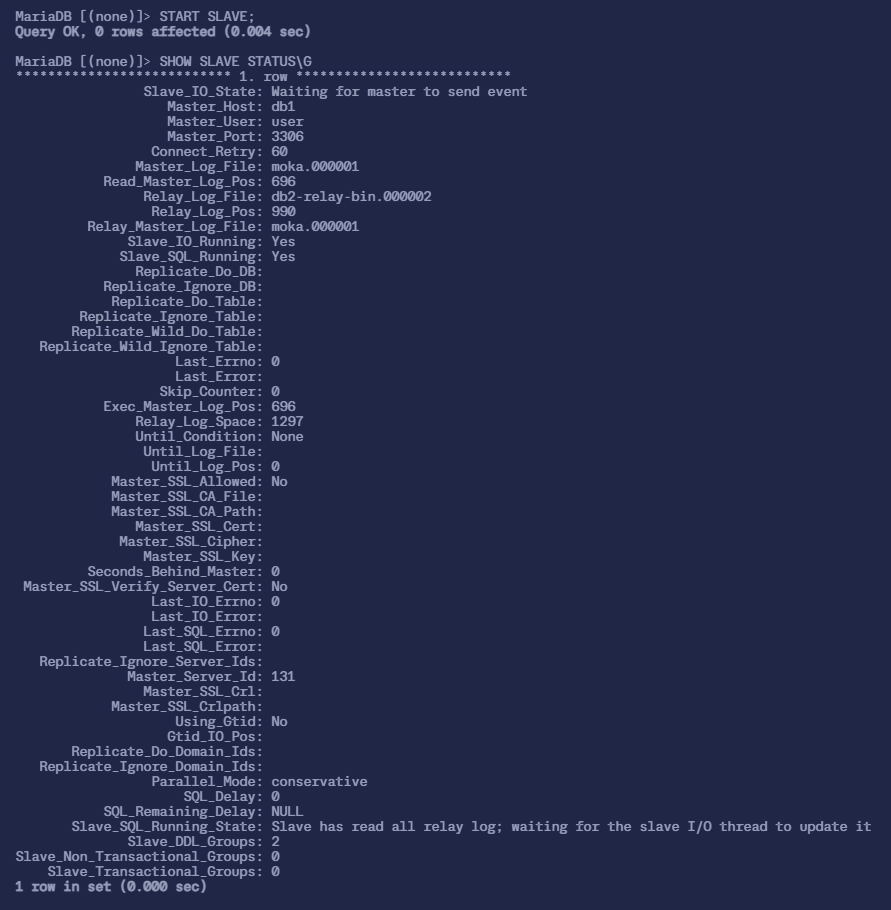
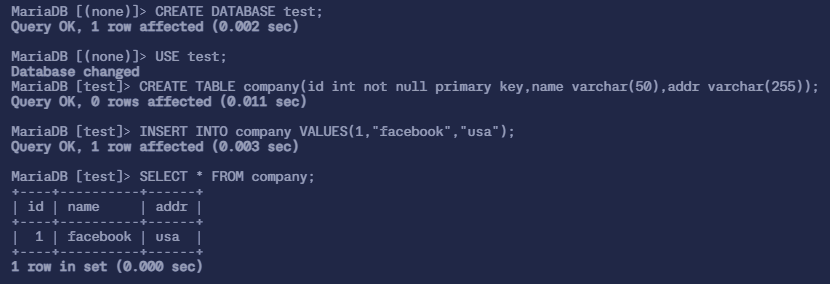
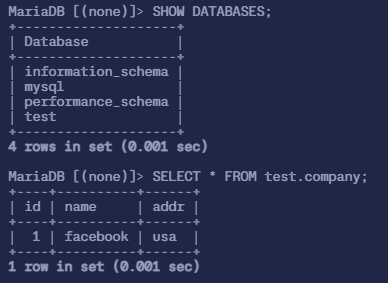
2.1.5 验证主从数据库的同步功能
先在 db1 的数据库中创建库 test,并在库 test 中创建表 company,插入表数据
1 | |
此时 从 db2 的数据库就会同步主节点数据库创建的 test 库,可以在从节点查询 test 数据库与表 company
如果可以查询到信息,就能验证主从数据库集群功能在正常运行
1 | |
2.1.6 新建 gpmall 数据库
将提供的 gpmall.sql 数据库文件上传至 db1 节点的 /root 目录下
1 | |
1 | |

2.2 部署 mycat 服务
2.2.1 编辑 mycat 的配置文件
配置 mycat 服务读写分离的 schema.xml 配置文件在 /usr/local/mycat/conf/ 目录下
1 | |
- 注:
sqlMaxLimit:配置默认查询数量database:配置真实数据库名balance="0":不开启读写分离机制,所有读操作都发送到当前可用的writeHost上balance="1":全部的readHost与stand by writeHost参与 select 语句的负载均衡balance="2":所有读操作都随机的在writeHost、readHost上分发balance="3":所有读请求随机地分发到writeHost对应的readHost执行,writeHost不负担读压力(注:这个东西只在 1.4 及其之后的版本才有,1.3 之前的版本都没有)writeType="0":所有写操作发送配置的第一个writeHost,第一个挂了需要切换到还生存的第二个writeHost,重新启动后以切换后的为准,切换记录在配置文件dnindex.properties中
然后修改 schema.xml 的用户权限
1 | |
2.2.2 编辑 mycat 的访问用户
修改 /usr/local/mycat/conf 目录下的 server.xml 文件,修改 root 用户的访问密码与数据库,密码设置为 123456,访问 mycat 的逻辑库为 gpmall
1 | |
最后 /usr/local/mycat/conf/server.xml 最后部分将会变成这个样子
1 | |
2.2.3 启动 mycat 服务
1 | |

2.3 部署 ZooKeeper 集群服务
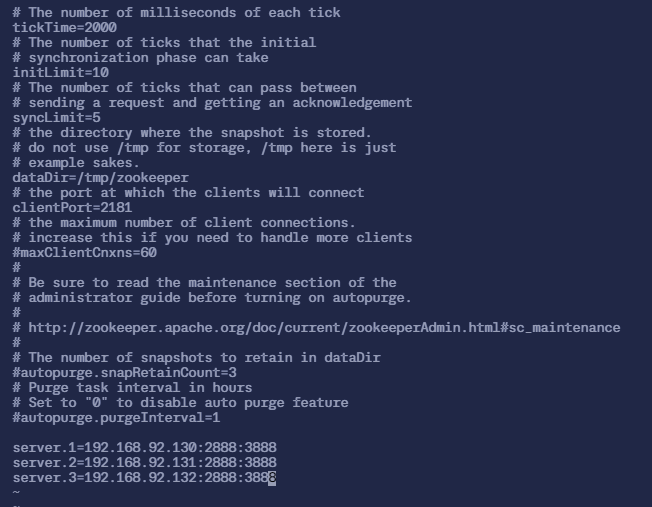
2.3.1 修改 ZooKeeper 配置文件
在 zookeeper1、zookeeper2、zookeeper3 上都修改
1 | |
1 | |
内容解析
tickTime:tickTime是initLimit和syncLimit两个超时配置的基本单位,例如对于initLimit,其配置值为5,且tickTime为2000时,则说明其超时时间为 2000ms × 5 =10sinitLimit:ZooKeeper 集群模式下包含多个 zk 进程(zk 进程: ZooKeeper 集群中的各个服务器进程),其中一个进程为 leader,余下的进程为 follower- 当 follower 最初与 leader 建立连接时,他们之间会传输相当多的数据,尤其是 follower 的数据落后 leader 很多
initLimit配置 follower 与 leader 之间建立连接后进行同步的最长时间
syncLimit:配置 follower 与 leader 之间发送消息,请求与应答的最大时间长度dataDir:用于指定 ZooKeeper 存储数据的目录,包括事务日志和快照(snapshot)
在集群模式下,这个目录还包含一个myid文件,用于标识每个节点的唯一身份(ID),myid文件的内容只有一行,且内容只能为 1~255 之间的数字,这个数字即为<server.id>中的 ID,表示 zk 进程的 ID<server.id>=<host>:<port1>:<port2>:<server.id>:这是一个数字,表示 ZooKeeper 集群中每个节点的唯一标识(ID)。这个 ID 需要与对应节点的myid文件中的内容一致。<host>:这个字段指定了节点的IP地址。在集群内部通信时,通常使用内网IP。<port1>:这是集群中 follower 和 leader 之间进行消息交换的端口。ZooKeeper 集群中,follower 节点通过这个端口与 leader 节点进行数据同步和其他通信。<port2>:这是用于 leader 选举的端口。当集群中的节点需要选举新的 leader 时,它们通过这个端口进行通信。
2.3.2 创建 myid 文件
在 3 台机器的 dataDir 目录(此处应为 /tmp/zookeeper)下,分别创建一个 myid 文件,文件内容分别只有一行,其内容为 1, 2, 3
即文件中只有一个数字,这个数字即为上面 zoo.cfg 配置文件中指定的值
ZooKeeper 时根据该文件来决定 ZooKeeper 集群各个机器的身份分配
1 | |
2.3.3 启动 ZooKeeper
1 | |
然后查看三台机器的状态
zookeeper1 节点
1 | |
zookeeper2 节点
1 | |
zookeeper3 节点
1 | |
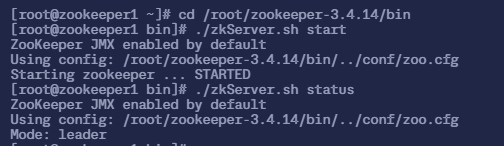
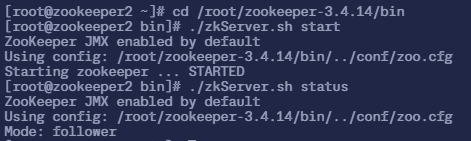
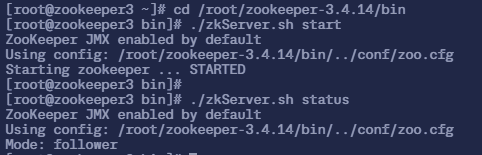
可以看到,3 个节点, zookeeper2 是 leader,其他的都是 follower
2.4 部署 Kafka 服务
2.4.1 修改配置文件
在 zookeeper1、zookeeper2、zookeeper3 上都修改
(*注意: broker.id 应不一样)
1 | |
- 内容解析:
broker.id:每台机器都不一样,相当于在 ZooKeeper 中的<server.id>zookeeper.connect:因为有 3 台 ZooKeeper 服务器,所以这里都得配置上listeners:listeners配置项用于指定 Kafka broker 的监听地址和端口。通常设置为当前节点的内网IP和默认的 Kafka 端口9092

2.4.2 启动 Kafka 服务
在 zookeeper1、zookeeper2、zookeeper3 上
1 | |
测试 Kafka 服务是否能正常运行,首先在 zookeeper1 服务器上
1 | |
- 如果成功的话,会输出
Created topic "test"

虽然 topic 是在 192.168.104.130 上创建的,但是在其他机器上也能看到,所以可以用其他机器查看到 zookeeper1 机器上查看 topic
在 zookeeper2 节点 和 zookeeper3 节点上
1 | |


2.5 部署 redis 服务
在 Redis 服务器上,修改 redis 配置文件,编辑 /etc/redis.conf 文件
1 | |
然后启动 Redis 服务
1 | |

*注:(错误)日志的位置
- MariaDB:看
/etc/my.cnf我配置的是log_error = /var/log/mariadb/mariadb.log - mycat:
- 主日志:
/usr/local/mycat/logs/mycat.log - 启动脚本相关日志,主要记录启动或关闭时的事件:
/usr/local/mycat/logs/wrapper.log - 压缩的历史日志:
/usr/local/mycat/logs/2024-09/mycat-09-10-1.log.gz(解压后使用)
- 主日志:
- ZooKeeper:
/root/zookeeper-3.4.14/bin/zookeeper.out - Kafka:
- 主日志:
/root/kafka_2.11-1.1.1/logs/server.log - 输出日志:
/root/kafka_2.11-1.1.1/logs/kafkaServer.out
- 主日志:
- redis:
/var/log/redis/redis.log
*注:(错误)日志解析
1. MariaDB
1 | |
解析:**[Note]:提示消息;[Warning]:警告消息;[Error]**:错误消息
InnoDB 初始化和设置日志
1
2
3
4
52024-09-14 1:09:37 0 [Note] InnoDB: If the mysqld execution user is authorized, page cleaner thread priority can be changed. See the man page of setpriority().
2024-09-14 1:09:37 0 [Note] InnoDB: 128 out of 128 rollback segments are active.
2024-09-14 1:09:37 0 [Note] InnoDB: Creating shared tablespace for temporary tables
2024-09-14 1:09:37 0 [Note] InnoDB: Setting file './ibtmp1' size to 12 MB. Physically writing the file full; Please wait ...
2024-09-14 1:09:37 0 [Note] InnoDB: File './ibtmp1' size is now 12 MB. MariaDB 的 InnoDB 存储引擎正在初始化和设置一些关键资源。这包括检查用户权限(user is authorized)、激活回滚段(rollback segments)、创建共享表空间(temporary tables,用于临时表的存储),并设置临时文件的大小:
ibtmp1是临时表的存储文件,大小设置为 12 MBInnoDB 启动日志
1
2024-09-14 1:09:37 0 [Note] InnoDB: 10.3.18 started; log sequence number 2036727; transaction id 472 InnoDB 已成功启动,版本为
10.3.18,并记录了当前的 日志序列号(log sequence number) 为 2036727 和 事务 ID (transaction id) 为 472加载缓冲池、禁用插件
1
22024-09-14 1:09:37 0 [Note] InnoDB: Loading buffer pool(s) from /var/lib/mysql/ib_buffer_pool
2024-09-14 1:09:37 0 [Note] Plugin 'FEEDBACK' is disabled. InnoDB 正在加载之前保存的缓冲池(buffer pool(s)),禁用了
FEEDBACK插件,不允许 MariaDB 匿名收集使用统计信息并反馈给 MariaDB 开发团队MariaDB 启动完毕
1
22024-09-14 1:09:37 0 [Note] /usr/sbin/mysqld: ready for connections.
Version: '10.3.18-MariaDB-log' socket: '/var/lib/mysql/mysql.sock' port: 3306 MariaDB Server MariaDB 服务器启动完成,准备接受客户端连接,监听端口为
3306。socket文件位于/var/lib/mysql/mysql.sock二进制日志同步到从服务器
1
2024-09-14 1:10:35 10 [Note] Start binlog_dump to slave_server(1), pos(moka.000006, 337) MariaDB 开始将主服务器的二进制日志(binlog)发送给 ID 为
1的从服务器,开始的位置为moka.000006文件的第337字节处。这个过程是主从复制的一部分MariaDB 正常关机、InnoDB 的关闭日志
1
2
3
4
52024-09-14 1:10:38 0 [Note] /usr/sbin/mysqld (initiated by: unknown): Normal shutdown
2024-09-14 1:10:38 0 [Note] InnoDB: Starting shutdown...
2024-09-14 1:10:38 0 [Note] InnoDB: Dumping buffer pool(s) to /var/lib/mysql/ib_buffer_pool
2024-09-14 1:10:38 0 [Note] InnoDB: Buffer pool(s) dump completed at 240914 1:10:38
2024-09-14 1:10:40 0 [Note] InnoDB: Shutdown completed; log sequence number 2036761; transaction id 473 MariaDB 正在执行正常关机程序,InnoDB 正在关闭,并将缓冲池的内容转储到磁盘。在关闭过程中,InnoDB 会将所有活动的日志和事务信息写入磁盘,以确保数据一致性
MariaDB 再次启动
1
22024-09-14 1:10:40 0 [Note] /usr/sbin/mysqld: ready for connections.
Version: '10.3.18-MariaDB-log' socket: '/var/lib/mysql/mysql.sock' port: 3306 MariaDB Server MariaDB 重新启动,并再次准备接受连接
二进制日志复制
1
2024-09-14 1:11:38 13 [Note] Start binlog_dump to slave_server(1), pos(moka.000007, 337) MariaDB 开始将二进制日志传输给从服务器。这次的二进制日志文件是
moka.000007,传输从第337字节开始
2. mycat
1 | |
解析:DEBUG: 调试信息;INFO: 一般信息;WARN: 警告信息;ERROR: 错误信息;FATAL: 严重错误信息
连接成功
1
2024-09-14 01:06:31.143 INFO [$_NIOREACTOR-2-RW] ... - connectionAcquired MySQLConnection [id=34, lastTime=1726275991136, user=root, schema=gpmall, ... host=192.168.104.131, port=3306, ...]日志显示 mycat 成功与 MySQL 数据库建立了连接
MySQLConnection [id=34]: 表示这个连接的 ID 是 34user=root: 连接使用的数据库用户是rootschema=gpmall: 正在访问的数据库是gpmallhost=192.168.104.131, port=3306: MySQL 数据库的主机 IP 是192.168.104.131,端口是3306
连接关闭
1
2024-09-14 01:09:35.500 INFO [$_NIOREACTOR-3-RW] ... - close connection,reason:no handler ,MySQLConnection [id=35, ... host=192.168.104.131, port=3306, ...] mycat 正在关闭 ID 为
35的连接。关闭原因是no handler 这通常意味着没有连接处理器。可能是由于连接空闲或者超时未使用,mycat 主动关闭了连接
无处理器绑定的警告
1
2024-09-14 01:09:35.500 WARN [$_NIOREACTOR-2-RW] ... - no handler bind in this con ... MySQLConnection [id=34, ...] 这是一个警告信息,表示 ID 为
34的连接没有绑定任何处理器 这可能是因为连接已经空闲超时,或者 mycat 认为这个连接不再被需要
连接池中创建新连接
1
2024-09-14 01:09:41.140 INFO [Timer0] ... - no ilde connection in pool,create new connection for hostM1 of schema gpmall mycat 发现连接池中没有可用的空闲连接,于是创建了一个新的连接
连接池中的连接不足
1
2024-09-14 01:11:31.139 INFO [Timer1] ... - create connections ,because idle connection not enough ,cur is 1, minCon is 10 for hostM1 连接池中的空闲连接不足。当前有 1 个连接,而最小空闲连接数要求为 10,mycat 正在为
hostM1创建更多的连接以满足最低连接数的要求新连接获取
1
2024-09-14 01:16:31.144 INFO [$_NIOREACTOR-2-RW] ... - connectionAcquired MySQLConnection [id=42, ...] 一个新的 MySQL 连接被成功获取,连接 ID 为
42,并与192.168.104.131:3306上的 MySQL 数据库进行连接
3. ZooKeeper
1 | |
解析:DEBUG: 调试信息;INFO: 一般信息;WARN: 警告信息;ERROR: 错误信息;FATAL: 严重错误信息
会话建立
1
2024-09-13 09:53:37,356 [myid:1] - INFO [CommitProcessor:1:ZooKeeperServer@694] - Established session 0x1000024aca20002 with negotiated timeout 30000 for client /192.168.104.134:37020 ZooKeeper 成功为客户端
/192.168.104.134:37020建立了会话,分配的会话 ID 是0x1000024aca20002,并协商了 30000 毫秒的超时时间会话终止
1
2024-09-13 09:53:37,414 [myid:1] - INFO [ProcessThread(sid:1 cport:-1)::PrepRequestProcessor@487] - Processed session termination for sessionid: 0x1000024aca20002 会话 ID 为
0x1000024aca20002的会话已经被终止。终止的原因可能是客户端主动断开连接或超时套接字连接关闭
1
2024-09-13 09:53:37,419 [myid:1] - INFO [NIOServerCxn.Factory:0.0.0.0/0.0.0.0:2181:NIOServerCnxn@1056] - Closed socket connection for client /192.168.104.134:37020 which had sessionid 0x1000024aca20002 ZooKeeper 关闭了与客户端
/192.168.104.134:37020的套接字连接,该客户端的会话 ID 是0x1000024aca20002节点不存在的错误
1
2024-09-13 10:03:07,718 [myid:1] - INFO [ProcessThread(sid:1 cport:-1)::PrepRequestProcessor@653] - Got user-level KeeperException when processing sessionid:0x20000243eba0000 type:setData cxid:0x41 zxid:0x30000004b txntype:-1 reqpath:n/a Error Path:/config/topics/user-register-succ-topic Error:KeeperErrorCode = NoNode for /config/topics/user-register-succ-topic ZooKeeper 在处理客户端的
setData请求时遇到NoNode错误,表示客户端尝试修改不存在的 ZNode/config/topics/user-register-succ-topic接受新的客户端连接
1
2024-09-13 10:03:12,861 [myid:1] - INFO [NIOServerCxn.Factory:0.0.0.0/0.0.0.0:2181:NIOServerCnxnFactory@222] - Accepted socket connection from /192.168.104.137:34516 ZooKeeper 接受了来自 IP 地址
192.168.104.137:34516的新的套接字连接会话超时
1
2024-09-13 10:28:55,216 [myid:1] - INFO [SessionTracker:ZooKeeperServer@355] - Expiring session 0x1000024aca20004, timeout of 40000ms exceeded 会话 ID 为
0x1000024aca20004的会话因超时时间 40000 毫秒到期而失效。这意味着该会话超过了协商的超时时间,且客户端没有发送任何保持活动的信号会话终止处理
1
2024-09-13 10:28:55,219 [myid:1] - INFO [ProcessThread(sid:1 cport:-1)::PrepRequestProcessor@487] - Processed session termination for sessionid: 0x1000024aca20004 ZooKeeper 处理了会话 ID 为
0x1000024aca20004的会话终止操作。这通常是在超时或客户端主动断开连接时执行的无法从客户端读取数据
1
2024-09-13 10:28:14,438 [myid:1] - WARN [NIOServerCxn.Factory:0.0.0.0/0.0.0.0:2181:NIOServerCnxn@376] - Unable to read additional data from client sessionid 0x1000024aca20004, likely client has closed socket ZooKeeper 在尝试从客户端读取数据时失败。可能的原因是客户端已经关闭了连接。日志级别为
WARN,表示这是一个需要注意的异常情况新的客户端会话建立
1
2024-09-13 10:31:18,115 [myid:1] - INFO [CommitProcessor:1:ZooKeeperServer@694] - Established session 0x1000024aca20007 with negotiated timeout 40000 for client /192.168.104.137:34552 ZooKeeper 为客户端
192.168.104.137:34552创建了一个新的会话,协商的超时时间为 40000 毫秒,分配的会话 ID 是0x1000024aca20007
4. Kafka
1 | |
- 解析:DEBUG: 调试信息;INFO: 一般信息;WARN: 警告信息;ERROR: 错误信息;FATAL: 严重错误信息
- Kafka broker 1 在 1 毫秒内执行了过期位移的检查操作,但没有发现任何需要删除的过期位移
- Kafka broker 1 再次执行了过期位移检查,但没有发现任何过期位移,且操作在不到 1 毫秒内完成
- Kafka broker 1 第三次执行了过期位移检查,没有找到过期位移,检查耗时 1 毫秒
5. redis
1 | |
解析:
开始服务
1
8272:C 13 Sep 09:54:05.846 * supervised by systemd, will signal readiness 交代了 redis 的 进程 ID 是
8272,是作为 子进程(child process,也就是上面的C) 启动的,由systemd进行监督管理,并即将通知systemd说它已经准备好开始工作了欢迎信息
1
2
3
4
5
6
7
8
9
10
11
12
13
14
15
16
17
18_._
_.-``__ ''-._
_.-`` `. `_. ''-._ Redis 3.2.12 (00000000/0) 64 bit
.-`` .-```. ```\/ _.,_ ''-._
( ' , .-` | `, ) Running in standalone mode
|`-._`-...-` __...-.``-._|'` _.-'| Port: 6379
| `-._ `._ / _.-' | PID: 8272
`-._ `-._ `-./ _.-' _.-'
|`-._`-._ `-.__.-' _.-'_.-'|
| `-._`-._ _.-'_.-' | http://redis.io
`-._ `-._`-.__.-'_.-' _.-'
|`-._`-._ `-.__.-' _.-'_.-'|
| `-._`-._ _.-'_.-' |
`-._ `-._`-.__.-'_.-' _.-'
`-._ `-.__.-' _.-'
`-._ _.-'
`-.__.-'
这段是 Redis 启动时的欢迎信息,显示了 redis 的版本是
3.2.12、进程 ID 是8272、端口信息是6379TCP backlog 设置警告
1
8272:M 13 Sep 09:54:05.849 # WARNING: The TCP backlog setting of 511 cannot be enforced because /proc/sys/net/core/somaxconn is set to the lower value of 128. redis 尝试设置 TCP backlog 为 511,但系统限制为 128
正在运行
1
8272:M 13 Sep 09:54:05.849 # Server started, Redis version 3.2.12 redis 服务器已经启动,正在运行 3.2.12 版本
overcommit_memory 警告
1
8272:M 13 Sep 09:54:05.849 # WARNING overcommit_memory is set to 0! Background save may fail under low memory condition. To fix this issue add 'vm.overcommit_memory = 1' to /etc/sysctl.conf and then reboot or run the command 'sysctl vm.overcommit_memory=1' for this to take effect. 系统的
overcommit_memory参数设置为 0,意味着内存分配受到系统限制,可能导致 Redis 在内存不足时无法进行后台持久化保存THP (Transparent Huge Pages) 警告
1
8272:M 13 Sep 09:54:05.850 # WARNING you have Transparent Huge Pages (THP) support enabled in your kernel. This will create latency and memory usage issues with Redis. To fix this issue run the command 'echo never > /sys/kernel/mm/transparent_hugepage/enabled' as root, and add it to your /etc/rc.local in order to retain the setting after a reboot. Redis must be restarted after THP is disabled. 透明大页(Transparent Huge Pages, THP)在你的系统内核中已启用,但这会导致 Redis 的内存使用和性能出现问题,增加延迟
准备连接
1
8272:M 13 Sep 09:54:05.850 * The server is now ready to accept connections on port 6379 Redis 服务器已经准备好开始接受客户端连接,监听的端口是
6379
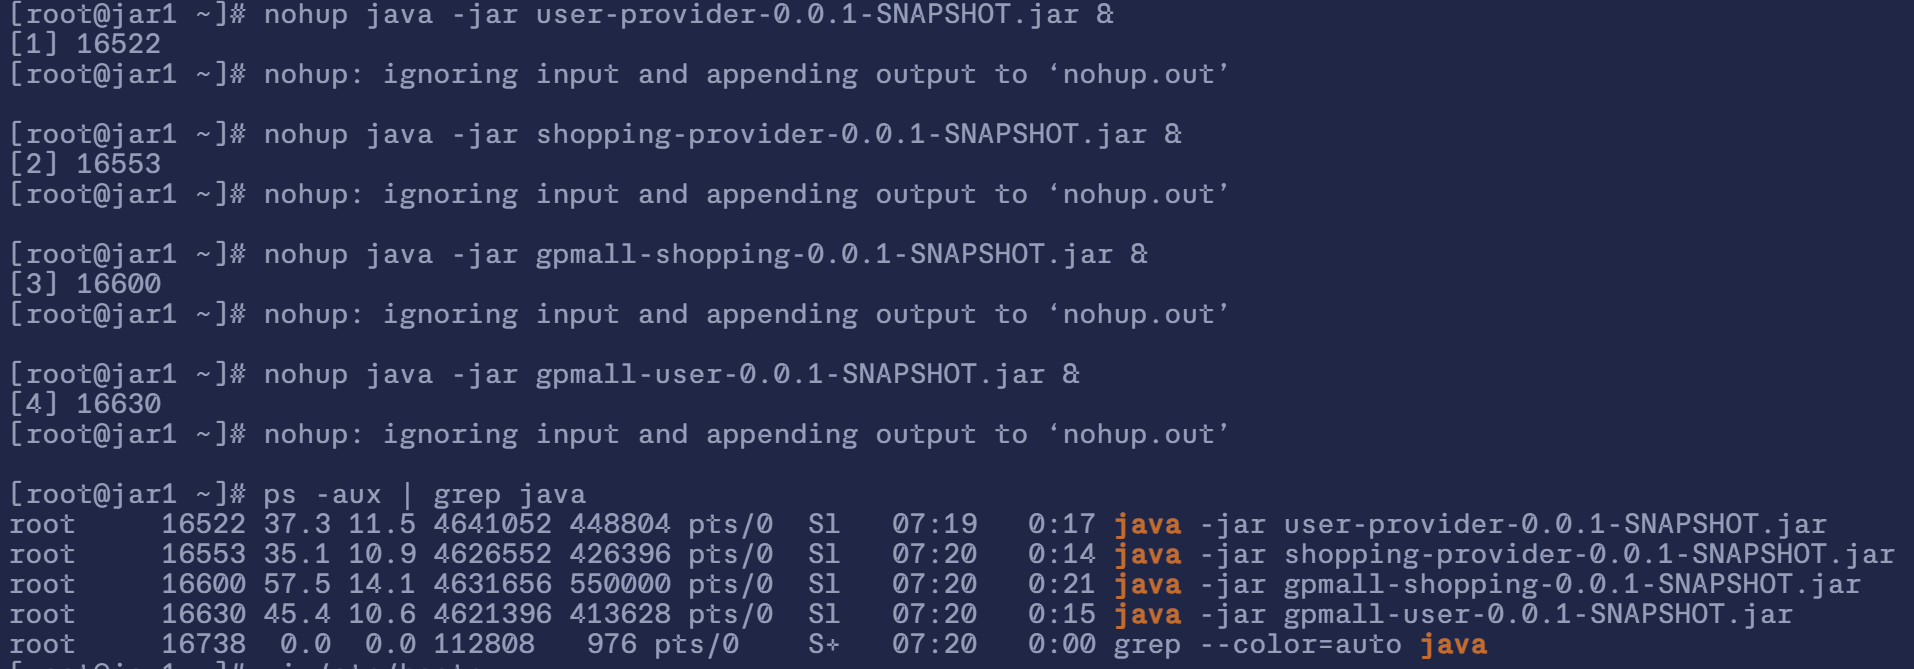
3. 配置后端
将提供的 4 个 jar 包,上传至 jar1、jar2 节点的/root 目录下,然后在 jar1 和 jar2 两个机器上运行这 4 个 jar 包
1 | |
1 | |
* 检查 / 日志 (解析)
检查:
使用
ps -aux | grep java检查那几个 jar 包是否运行日志:
nohup.out
日志解析
1
2
3
4
5
6
7
8
9
10
11
12
13
14
15
16
17
18
19
20
21
22
23
24
25
26
27
28
29
30
31
32
33
34
35
36
37
38
39
40
41
42
43
44
45
46
47
48
49
50
51$ tail -50 nohup.out
2024-09-13 10:31:27.883 INFO 8688 --- [ main] org.apache.zookeeper.ZooKeeper : Client environment:host.name=jar1
2024-09-13 10:31:27.883 INFO 8688 --- [ main] org.apache.zookeeper.ZooKeeper : Client environment:java.version=1.8.0_412
2024-09-13 10:31:27.883 INFO 8688 --- [ main] org.apache.zookeeper.ZooKeeper : Client environment:java.vendor=Red Hat, Inc.
2024-09-13 10:31:27.883 INFO 8688 --- [ main] org.apache.zookeeper.ZooKeeper : Client environment:java.home=/usr/lib/jvm/java-1.8.0-openjdk-1.8.0.412.b08-1.el7_9.x86_64/jre
2024-09-13 10:31:27.883 INFO 8688 --- [ main] org.apache.zookeeper.ZooKeeper : Client environment:java.class.path=gpmall-shopping-0.0.1-SNAPSHOT.jar
2024-09-13 10:31:27.883 INFO 8688 --- [ main] org.apache.zookeeper.ZooKeeper : Client environment:java.library.path=/usr/java/packages/lib/amd64:/usr/lib64:/lib64:/lib:/usr/lib
2024-09-13 10:31:27.883 INFO 8688 --- [ main] org.apache.zookeeper.ZooKeeper : Client environment:java.io.tmpdir=/tmp
2024-09-13 10:31:27.883 INFO 8688 --- [ main] org.apache.zookeeper.ZooKeeper : Client environment:java.compiler=<NA>
2024-09-13 10:31:27.883 INFO 8688 --- [ main] org.apache.zookeeper.ZooKeeper : Client environment:os.name=Linux
2024-09-13 10:31:27.883 INFO 8688 --- [ main] org.apache.zookeeper.ZooKeeper : Client environment:os.arch=amd64
2024-09-13 10:31:27.883 INFO 8688 --- [ main] org.apache.zookeeper.ZooKeeper : Client environment:os.version=3.10.0-1160.45.1.el7.x86_64
2024-09-13 10:31:27.883 INFO 8688 --- [ main] org.apache.zookeeper.ZooKeeper : Client environment:user.name=root
2024-09-13 10:31:27.883 INFO 8688 --- [ main] org.apache.zookeeper.ZooKeeper : Client environment:user.home=/root
2024-09-13 10:31:27.883 INFO 8688 --- [ main] org.apache.zookeeper.ZooKeeper : Client environment:user.dir=/root
2024-09-13 10:31:27.884 INFO 8688 --- [ main] org.apache.zookeeper.ZooKeeper : Initiating client connection, connectString=zk1.mall:2181,zookeeper::9090 sessionTimeout=60000 watcher=org.apache.curator.ConnectionState@4b2c5e02
2024-09-13 10:31:27.906 INFO 8688 --- [(zk1.mall:2181)] org.apache.zookeeper.ClientCnxn : Opening socket connection to server zk1.mall/192.168.104.135:2181. Will not attempt to authenticate using SASL (unknown error)
2024-09-13 10:31:27.914 INFO 8688 --- [(zk1.mall:2181)] org.apache.zookeeper.ClientCnxn : Socket connection established to zk1.mall/192.168.104.135:2181, initiating session
2024-09-13 10:31:27.916 INFO 8688 --- [ main] o.a.c.f.imps.CuratorFrameworkImpl : Default schema
2024-09-13 10:31:27.934 INFO 8688 --- [(zk1.mall:2181)] org.apache.zookeeper.ClientCnxn : Session establishment complete on server zk1.mall/192.168.104.135:2181, sessionid = 0x3000023e26f0003, negotiated timeout = 40000
2024-09-13 10:31:27.945 INFO 8688 --- [ain-EventThread] o.a.c.f.state.ConnectionStateManager : State change: CONNECTED
2024-09-13 10:31:28.594 INFO 8734 --- [ main] o.a.d.c.s.b.f.a.ReferenceBeanBuilder : The bean[type:ReferenceBean] has been built.
2024-09-13 10:31:28.694 INFO 8734 --- [ main] o.a.d.c.s.b.f.a.ReferenceBeanBuilder : The bean[type:ReferenceBean] has been built.
2024-09-13 10:31:28.726 INFO 8688 --- [ main] o.a.d.c.s.b.f.a.ReferenceBeanBuilder : The bean[type:ReferenceBean] has been built.
2024-09-13 10:31:28.818 INFO 8734 --- [ main] o.a.d.c.s.b.f.a.ReferenceBeanBuilder : The bean[type:ReferenceBean] has been built.
2024-09-13 10:31:28.923 INFO 8734 --- [ main] o.a.d.c.s.b.f.a.ReferenceBeanBuilder : The bean[type:ReferenceBean] has been built.
2024-09-13 10:31:29.024 INFO 8688 --- [ main] o.a.d.c.s.b.f.a.ReferenceBeanBuilder : The bean[type:ReferenceBean] has been built.
2024-09-13 10:31:29.193 INFO 8688 --- [ main] o.a.d.c.s.b.f.a.ReferenceBeanBuilder : The bean[type:ReferenceBean] has been built.
2024-09-13 10:31:29.267 INFO 8688 --- [ main] o.a.d.c.s.b.f.a.ReferenceBeanBuilder : The bean[type:ReferenceBean] has been built.
2024-09-13 10:31:29.437 INFO 8734 --- [ main] o.s.s.concurrent.ThreadPoolTaskExecutor : Initializing ExecutorService 'applicationTaskExecutor'
2024-09-13 10:31:29.464 INFO 8688 --- [ main] o.a.d.c.s.b.f.a.ReferenceBeanBuilder : The bean[type:ReferenceBean] has been built.
2024-09-13 10:31:29.931 INFO 8734 --- [ main] o.a.c.framework.CuratorFrameworkFactory : zkHosts:null,sessionTimeout:30000,connectionTimeout:30000,singleton:true,namespacenull
2024-09-13 10:31:30.083 INFO 8688 --- [ main] o.a.d.c.s.b.f.a.ReferenceBeanBuilder : The bean[type:ReferenceBean] has been built.
2024-09-13 10:31:30.199 INFO 8734 --- [ main] o.s.b.w.embedded.tomcat.TomcatWebServer : Tomcat started on port(s): 8082 (http) with context path ''
2024-09-13 10:31:30.203 INFO 8734 --- [ main] c.g.u.gpmalluser.GpmallUserApplication : Started GpmallUserApplication in 9.606 seconds (JVM running for 10.69)
2024-09-13 10:31:30.423 INFO 8688 --- [ main] o.s.b.a.e.web.EndpointLinksResolver : Exposing 2 endpoint(s) beneath base path '/actuator'
2024-09-13 10:31:30.714 INFO 8688 --- [ main] pertySourcedRequestMappingHandlerMapping : Mapped URL path [/v2/api-docs] onto method [public org.springframework.http.ResponseEntity<springfox.documentation.spring.web.json.Json> springfox.documentation.swagger2.web.Swagger2Controller.getDocumentation(java.lang.String,javax.servlet.http.HttpServletRequest)]
2024-09-13 10:31:31.020 INFO 8688 --- [ main] o.s.s.concurrent.ThreadPoolTaskExecutor : Initializing ExecutorService 'applicationTaskExecutor'
2024-09-13 10:31:31.282 INFO 8688 --- [ main] o.a.c.framework.CuratorFrameworkFactory : zkHosts:null,sessionTimeout:30000,connectionTimeout:30000,singleton:true,namespacenull
2024-09-13 10:31:31.651 INFO 8688 --- [ main] d.s.w.p.DocumentationPluginsBootstrapper : Context refreshed
2024-09-13 10:31:31.673 INFO 8688 --- [ main] d.s.w.p.DocumentationPluginsBootstrapper : Found 1 custom documentation plugin(s)
2024-09-13 10:31:31.673 INFO 8688 --- [ main] d.s.w.p.DocumentationPluginsBootstrapper : Skipping initializing disabled plugin bean swagger v2.0
2024-09-13 10:31:31.709 INFO 8688 --- [ main] o.s.b.w.embedded.tomcat.TomcatWebServer : Tomcat started on port(s): 8081 (http) with context path ''
2024-09-13 10:31:31.713 INFO 8688 --- [ main] c.g.s.g.GpmallShoppingApplication : Started GpmallShoppingApplication in 13.866 seconds (JVM running for 15.049)
2024-09-13 10:31:32.655 INFO 8640 --- [ntainer#0-0-C-1] o.a.k.c.c.internals.AbstractCoordinator : [Consumer clientId=consumer-2, groupId=mail-group-id] Attempt to heartbeat failed since group is rebalancing
2024-09-13 10:31:32.657 INFO 8640 --- [ntainer#0-0-C-1] o.a.k.c.c.internals.ConsumerCoordinator : [Consumer clientId=consumer-2, groupId=mail-group-id] Revoking previously assigned partitions [user-register-succ-topic-0]
2024-09-13 10:31:32.657 INFO 8640 --- [ntainer#0-0-C-1] o.s.k.l.KafkaMessageListenerContainer : partitions revoked: [user-register-succ-topic-0]
2024-09-13 10:31:32.657 INFO 8640 --- [ntainer#0-0-C-1] o.a.k.c.c.internals.AbstractCoordinator : [Consumer clientId=consumer-2, groupId=mail-group-id] (Re-)joining group
2024-09-13 10:31:32.670 INFO 8640 --- [ntainer#0-0-C-1] o.a.k.c.c.internals.AbstractCoordinator : [Consumer clientId=consumer-2, groupId=mail-group-id] Successfully joined group with generation 6
2024-09-13 10:31:32.672 INFO 8640 --- [ntainer#0-0-C-1] o.a.k.c.c.internals.ConsumerCoordinator : [Consumer clientId=consumer-2, groupId=mail-group-id] Setting newly assigned partitions []
2024-09-13 10:31:32.672 INFO 8640 --- [ntainer#0-0-C-1] o.s.k.l.KafkaMessageListenerContainer : partitions assigned: []解析:
开始运行
1
2
3
42024-09-13 10:31:27.883 INFO 8688 --- [main] org.apache.zookeeper.ZooKeeper : Client environment:host.name=jar1
2024-09-13 10:31:27.883 INFO 8688 --- [main] org.apache.zookeeper.ZooKeeper : Client environment:java.version=1.8.0_412
2024-09-13 10:31:27.883 INFO 8688 --- [main] org.apache.zookeeper.ZooKeeper : Client environment:java.vendor=Red Hat, Inc.
2024-09-13 10:31:27.883 INFO 8688 --- [main] org.apache.zookeeper.ZooKeeper : Client environment:java.home=/usr/lib/jvm/... ZooKeeper 客户端开始运行,并记录了当前客户端运行的主机名称为
jar1,Java 运行时的版本号为1.8.0_412,Java 环境的供应商为Red Hat, Inc.,Java 的安装路径为/usr/lib/jvm/...正在连接
1
2
3
42024-09-13 10:31:27.884 INFO 8688 --- [main] org.apache.zookeeper.ZooKeeper : Initiating client connection, connectString=zk1.mall:2181
2024-09-13 10:31:27.906 INFO 8688 --- [zk1.mall:2181] org.apache.zookeeper.ClientCnxn : Opening socket connection to server zk1.mall/192.168.104.135:2181
2024-09-13 10:31:27.914 INFO 8688 --- [zk1.mall:2181] org.apache.zookeeper.ClientCnxn : Socket connection established to zk1.mall/192.168.104.135:2181
2024-09-13 10:31:27.934 INFO 8688 --- [zk1.mall:2181] org.apache.zookeeper.ClientCnxn : Session establishment complete on server zk1.mall/192.168.104.135:2181 ZooKeeper 客户端开始尝试连接到
zk1.mall:2181(ZooKeeper 服务器的地址和端口),正在尝试通过 IP 地址192.168.104.135的端口2181与 ZooKeeper 服务器建立套接字连接并且成功了,也建立了会话,并且与192.168.104.135:2181完成了会话协商Spring Boot 应用启动
1
22024-09-13 10:31:30.199 INFO 8734 --- [main] o.s.b.w.embedded.tomcat.TomcatWebServer : Tomcat started on port(s): 8082 (http)
2024-09-13 10:31:30.203 INFO 8734 --- [main] c.g.u.gpmalluser.GpmallUserApplication : Started GpmallUserApplication in 9.606 seconds Spring Boot 应用的嵌入式 Tomcat 服务器成功启动,并监听
8082端口,然后GpmallUserApplicationSpring Boot 应用在9.606秒内成功启动心跳失败
1
22024-09-13 10:31:32.657 INFO 8640 --- [ntainer#0-0-C-1] o.a.k.c.c.internals.AbstractCoordinator : [Consumer clientId=consumer-2, groupId=mail-group-id] Attempt to heartbeat failed since group is rebalancing
2024-09-13 10:31:32.657 INFO 8640 --- [ntainer#0-0-C-1] o.a.k.c.c.internals.ConsumerCoordinator : [Consumer clientId=consumer-2, groupId=mail-group-id] Revoking previously assigned partitions [user-register-succ-topic-0] Kafka 消费者客户端
consumer-2在尝试向mail-group-id消费者组发送心跳时失败,因为消费者组正在进行重新平衡(rebalancing) Kafka 消费者
consumer-2撤销了先前分配的分区user-register-succ-topic-0,这是消费者组重新平衡的一部分
4. 配置前端
将提供的 dist 文件夹上传至 nginx 节点的 /root 目录下,并复制到 nginx 项目目录
1 | |
然后修改 nginx 的配置文件 /etc/nginx/conf.d/default.conf
1 | |
- 配置解析:
upstream myuser/myshopping/mycashier:- 这些块定义了上游服务器的集群,分别代表了
myuser、myshopping、和mycashier服务 - 每个
upstream配置中,列出多个 IP 地址(192.168.104.137:8082和192.168.104.138:8082等)表示服务集群的后端节点 ip_hash:nginx 的负载均衡算法,基于客户端 IP 地址进行哈希计算,同一个客户端的请求将被分配到相同的服务器节点
- 这些块定义了上游服务器的集群,分别代表了
server{ }:listen 80:指定 nginx 监听 HTTP 请求的 80 端口server_name localhost:指定 nginx 的虚拟主机名(这里是localhost,可以根据实际需要替换为域名)location /:将根路径/的请求指向root路径/usr/share/nginx/html,用作默认的静态资源存储路径。location /user /shopping /cashier:分别将/user、/shopping、和/cashier路径下的请求转发到对应的upstream服务(myuser、myshopping、mycashier)。error_page:自定义错误页面,当遇到 HTTP 500、502、503 或 504 甚至是 404 错误时,使用/50x.html文件作为错误页面的返回
启动 nginx 服务
1 | |
* 检查 / 日志 (解析)
检查:
使用
nginx -t检查配置的 nginx 配置文件是否有语法错误,如果没有则会提示 OK 和 successful日志:
- 错误日志:
/var/log/nginx/error.log - 访问日志:
/var/log/nginx/access.log
- 错误日志:
日志解析:
1
2
3
4
$ tail -3 /var/log/nginx/error.log
2024/09/14 03:00:15 [error] 8340#8340: *7 open() "/usr/share/nginx/html/static/js/manifest.2d17a82764acff8145be.js" failed (2: No such file or directory), client: 192.168.104.36, server: localhost, request: "GET /static/js/manifest.2d17a82764acff8145be.js HTTP/1.1", host: "192.168.104.139", referrer: "http://192.168.104.139/"
2024/09/14 03:00:15 [error] 8340#8340: *7 open() "/usr/share/nginx/html/static/js/vendor.4f07d3a235c8a7cd4efe.js" failed (2: No such file or directory), client: 192.168.104.36, server: localhost, request: "GET /static/js/vendor.4f07d3a235c8a7cd4efe.js HTTP/1.1", host: "192.168.104.139", referrer: "http://192.168.104.139/"
2024/09/14 03:00:15 [error] 8340#8340: *7 open() "/usr/share/nginx/html/static/js/app.81180cbb92541cdf912f.js" failed (2: No such file or directory), client: 192.168.104.36, server: localhost, request: "GET /static/js/app.81180cbb92541cdf912f.js HTTP/1.1", host: "192.168.104.139", referrer: "http://192.168.104.139/"解析:
时间:
2024/09/14 03:00:15日志级别:
[error]进程和连接信息:
8340#8340: 这是 Nginx 的工作进程 ID 和线程 ID(通常是相同的,因为 Nginx 采用的是单线程工作进程)*7: 表示请求的内部连接 ID,用于标识特定的客户端请求
错误类型:
1
open() "/usr/share/nginx/html/static/js/manifest.2d17a82764acff8145be.js" failed (2: No such file or directory) 表示 Nginx 尝试打开文文件
/usr/share/nginx/html/static/js/manifest.2d17a82764acff8145be.js失败,原因是文件不存在(No such file or directory,错误代码 2)客户端信息:
client: 192.168.104.36: 发出请求的客户端 IP 地址是 `192.168.104.36服务器信息:
server: localhost: 处理这个请求的服务器配置是localhost请求信息:
request: "GET /static/js/manifest.2d17a82764acff8145be.js HTTP/1.1": 客户端发送了一个 HTTP GET 请求,尝试访问/static/js/manifest.2d17a82764acff8145be.js这个文件主机信息:
host: "192.168.104.139": 客户端在请求时的Host头字段中指定了目标主机为192.168.104.139引用页面(referrer):
referrer: "http://192.168.104.139/": 客户端请求时的来源页面是http://192.168.104.139/,即客户端从这个页面上点击了某个链接,试图访问上述的静态资源
剩下两个都大差不差,只是客户端尝试访问的文件不同
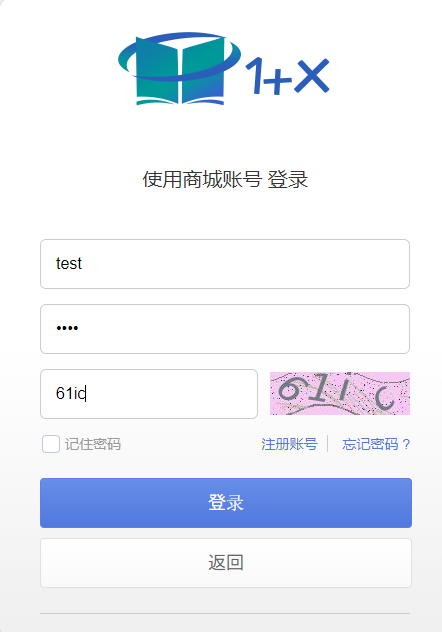
5. 网页访问
打开 Chrome,在地址栏里输入 http://192.168.104.139,访问页面

单击右上角“头像”,进行登录操作,使用 用户名/密码 为 test/test 进行登录
登录后,可进行购买商品操作,单击首页“坚果 R1”图片

点击完 “现在购买” 按钮,跳转到提交订单页面
至此,集群部署应用系统完成。