NOTE: RUNNING ALL PARTS OF THIS SCRIPT IS RECOMMENDED FOR ALL MariaDB SERVERS IN PRODUCTION USE! PLEASE READ EACH STEP CAREFULLY!
In order to log into MariaDB to secure it, we'll need the current password for the root user. If you've just installed MariaDB, and you haven't set the root password yet, the password will be blank, so you should just press enter here.
# 这里需要输入当前 root 用户的密码 # 如果刚安装 MariaDB 并还没有设置 root 用户密码,那么密码是空的,按回车即可 Enter current password for root (enter for none): #默认按回车 OK, successfully used password, moving on...
Setting the root password ensures that nobody can log into the MariaDB root user without the proper authorisation.
# 这里问你是否需要设置 root 用户的密码 # 按 Y 进行设置 Set root passworNew password: #这里输入密码123456 Re-enter new password: #确认密码:再输一遍123456 Password updated successfully! Reloading privilege tables.. ... Success!
By default, a MariaDB installation has an anonymous user, allowing anyone to log into MariaDB without having to have a user account created for them. This is intended only for testing, and to make the installation go a bit smoother. You should remove them before moving into a production environment.
# 是否移除匿名用户 # 按 Y 进行移除 Remove anonymous users? [Y/n] d? [Y/n] y ... Success!
Normally, root should only be allowed to connect from 'localhost'. This ensures that someone cannot guess at the root password from the network.
# 是否禁用 root 用户远程登录 # 按 Y 禁用远程登录 Disallow root login remotely? [Y/n] n ... skipping.
By default, MariaDB comes with a database named 'test' that anyone can access. This is also intended only for testing, and should be removed before moving into a production environment.
# 是否移除测试数据库 test 及其权限 # 按 Y 移除 Remove test database and access to it? [Y/n] y - Dropping test database... ... Success! - Removing privileges on test database... ... Success!
Reloading the privilege tables will ensure that all changes made so far will take effect immediately.
# 以 root 用户身份,使用密码 123456 创建一个名称为 test 数据库 $ mysqladmin -uroot -p123456 create test
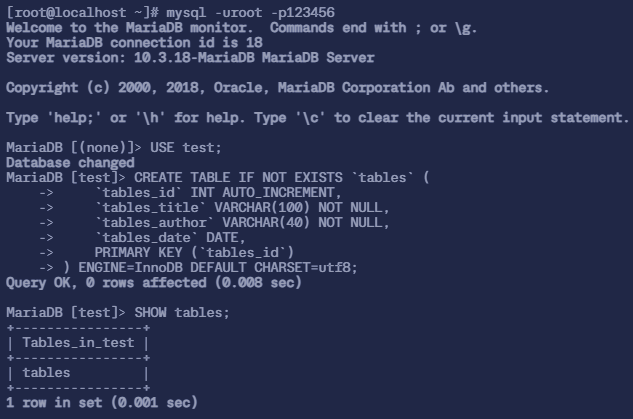
# 在 test 数据库中创建一个名为 tables 数据表 # 首先先进入数据库 $ mysql -uroot -p123456 Welcome to the MariaDB monitor. Commands end with ; or \g. Your MariaDB connection id is 16 Server version: 10.3.18-MariaDB MariaDB Server
Copyright (c) 2000, 2018, Oracle, MariaDB Corporation Ab and others.
Type 'help;' or '\h' for help. Type '\c' to clear the current input statement.
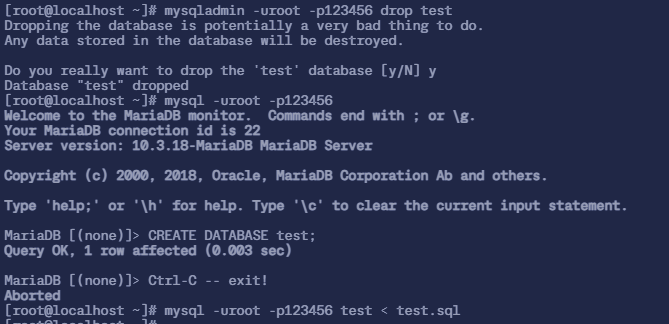
# 首先删除 test 数据库 $ mysqladmin -uroot -p123456 drop test Dropping the database is potentially a very bad thing to do. Any data stored in the database will be destroyed.
# 这里询问是否删除,输入 Y 进行确认删除 Do you really want to drop the 'test' database [y/N] y Database "test" dropped
# 然后登录数据库 $ mysql -uroot -p123456 Welcome to the MariaDB monitor. Commands end with ; or \g. Your MariaDB connection id is 22 Server version: 10.3.18-MariaDB MariaDB Server
Copyright (c) 2000, 2018, Oracle, MariaDB Corporation Ab and others.
Type 'help;' or '\h' for help. Type '\c' to clear the current input statement.
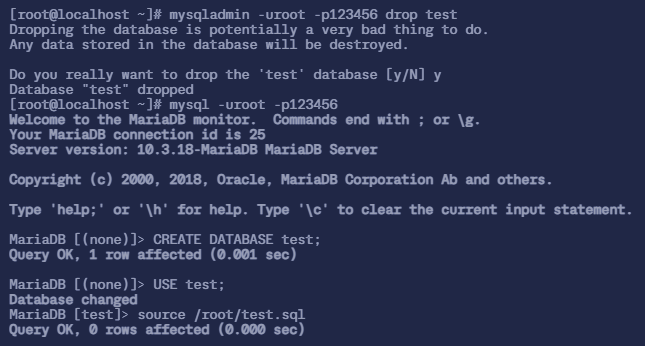
# 首先删除 test 数据库 $ mysqladmin -uroot -p123456 drop test Dropping the database is potentially a very bad thing to do. Any data stored in the database will be destroyed.
# 然后登录数据库 $ mysql -uroot -p123456 Welcome to the MariaDB monitor. Commands end with ; or \g. Your MariaDB connection id is 22 Server version: 10.3.18-MariaDB MariaDB Server
Copyright (c) 2000, 2018, Oracle, MariaDB Corporation Ab and others.
Type 'help;' or '\h' for help. Type '\c' to clear the current input statement.
# 切换到 test 数据库,并导入 MariaDB [(none)]> USE test; Database changed MariaDB [test]> source /root/test.sql
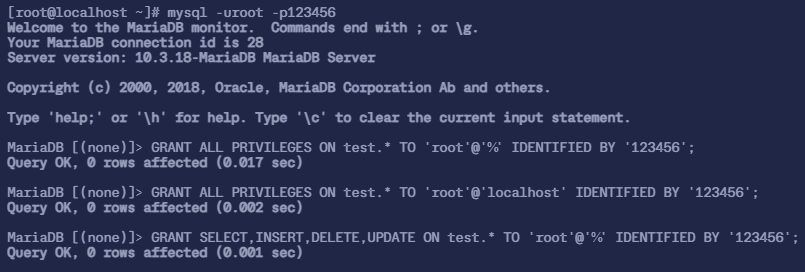
4. 添加用户并授权
1 2 3 4 5 6 7 8 9 10 11
# 授权 root 用户可以在任何节点 test 数据库下的所有表, '%' 代表所有节点机器
MariaDB [(none)]> GRANT ALL PRIVILEGES ON test.* TO 'root'@'%' IDENTIFIED BY '123456';
Query OK, 0 rows affected (0.017 sec)

# 授权 root 用户可以在任何节点 test 数据库下的所有表, 'localhost' 代表所有本机
MariaDB [(none)]> GRANT ALL PRIVILEGES ON test.* TO 'root'@'localhost' IDENTIFIED BY '123456';
Query OK, 0 rows affected (0.002 sec)

# 添加 root 用户对 test 数据库授予 增、删、改、查 的权限
MariaDB [(none)]> GRANT SELECT,INSERT,DELETE,UPDATE ON test.* TO 'root'@'%' IDENTIFIED BY '123456';
Query OK, 0 rows affected (0.001 sec)