MyCat 读写分离数据库集群 操作文档

MyCat 数据库集群

一、什么是数据库集群

​ 数据库集群是由多个数据库服务器组成的集合,这些服务器协同工作以提供高可用性、高性能和可扩展性。通过分散负载、提高可用性和增加吞吐量,数据库集群可以显著提升数据库的性能和可靠性。

​ 在数据库集群中,每个服务器都可以处理一部分数据和请求,当一个服务器发生故障时,其他服务器会自动接管其工作,以确保数据库的可用性。数据库集群的主要优势包括:

  • 高可用性:即使一个节点发生故障,也不会影响整个集群的运行。
  • 高性能:通过分散负载和增加吞吐量来提高数据库的性能。
  • 可扩展性:可以轻松地增加或减少节点来适应不断变化的数据需求。
  • 负载均衡:通过分散负载来避免单个节点过载。
  • 数据安全:通过备份和数据复制来确保数据的安全性和可用性。

二、数据库集群的作用

​ 数据库集群的作用主要包括以下几个方面:

  1. 提高可用性:通过冗余和故障转移机制,确保即使某个节点发生故障,系统仍能正常运行,从而提高数据库的可用性。
  2. 增强性能:通过负载均衡,将查询和数据处理任务分散到多个节点上,减少单个节点的负载,提高整体系统的性能。
  3. 扩展性:可以根据需求增加或减少节点,灵活调整系统的处理能力,满足不断变化的数据需求。
  4. 数据安全:通过数据复制和备份机制,确保数据在多个节点上都有副本,防止数据丢失,提高数据的安全性。
  5. 容错性:在某个节点出现故障时,其他节点可以自动接管其任务,确保系统的稳定性和可靠性。
  6. 简化维护:通过集群管理工具,可以集中管理和监控多个节点,简化系统的维护和管理工作。

三、部署数据库集群

​ 首先,准备这样三台机器:均使用 CentOS 7.2 系统、2vCPU / 4G 内存 / 50G 硬盘

IP 1 IP 2 主机名 节点
192.168.92.130 192.168.75.10 mycat MyCat 中间件服务节点
192.168.92.131 192.168.75.20 db1 MariaDB 数据库集群主节点
192.168.92.132 192.168.75.30 db2 MariaDB 数据库集群从节点

​ 三台机器的作用:

  • db1 和 db2 部署 MariaDB 数据库服务,搭建主从数据库集群;一台作为主节点,负责写入数据库信息;另一台作为从节点,负责读取数据库信息
  • mycat 部署 MyCat 数据库中间件服务,将用户提交的读写操作识别分发给相应的数据库节点

​ 这样将用户的访问操作、数据库的读与写操作分给 3 太主机,只有数据库集群的主节点接收 增、删、改 SQL 语句,从节点接收查询语句,分担了主节点的查询压力

1. 基础环境配置

1.1 修改主机名
1
2
3
4
5
6
7
8
9
10
11
12
13
$ sudo hostnamectl set-hostname mycat
$ bash
$ sudo hostnamectl
Static hostname: mycat
Icon name: computer-vm
Chassis: vm
Machine ID: e72e04755f264b69a75c218f22b44031
Boot ID: a335d3fc9cdf425cb2207cd5ec88ee35
Virtualization: vmware
Operating System: CentOS Linux 7 (Core)
CPE OS Name: cpe:/o:centos:centos:7
Kernel: Linux 3.10.0-1160.119.1.el7.x86_64
Architecture: x86-64
1
2
3
4
5
6
7
8
9
10
11
12
13
$ sudo hostnamectl set-hostname db1
$ bash
$ sudo hostnamectl
Static hostname: db1
Icon name: computer-vm
Chassis: vm
Machine ID: 7c077f6d2d6941cd8cf150a59f03ef6d
Boot ID: a874fa1d807e4003a0bf87c91b7c241a
Virtualization: vmware
Operating System: CentOS Linux 7 (Core)
CPE OS Name: cpe:/o:centos:centos:7
Kernel: Linux 3.10.0-1160.el7.x86_64
Architecture: x86-64
1
2
3
4
5
6
7
8
9
10
11
12
13
$ sudo hostnamectl set-hostname db2
$ bash
$ sudo hostnamectl
Static hostname: db2
Icon name: computer-vm
Chassis: vm
Machine ID: 5bfe23ed65a34b08aa029709502bc7c0
Boot ID: 5fa3cdeca56544db9fb206a11b8ac6bf
Virtualization: vmware
Operating System: CentOS Linux 7 (Core)
CPE OS Name: cpe:/o:centos:centos:7
Kernel: Linux 3.10.0-1160.el7.x86_64
Architecture: x86-64

1.1_11.1_21.1_3

1.2 编辑 hosts 文件
1
2
3
4
5
6
$ sudo vi /etc/hosts

# 填入以下内容
192.168.92.130 mycat
192.168.92.131 db1
192.168.92.132 db2

1.2

1.3 编辑 yum 安装源

​ 数据库集群需要安装 MariaDB 数据库服务,需要给集群虚拟机配置 yum 安装源文件,使用提供的 gpmall-repo 文件上传至 3 个虚拟机的 /opt 目录下,设置本地 yum 源

1
2
3
4
5
6
7
8
9
10
11
12
13
14
15
16
17
18
19
20
21
22
23
24
25
26
27
# 首先将 3 个节点 /etc/yum.repos.d/ 目录下的所有文件抖移动到 /media 目录下
$ sudo mv /etc/yum.repos.d/* /media/

# 然后使用 wget 命令下载 gpmall-repo,然后解压
$ sudo wget https://moka.anitsuri.top/images/gpmall/gpmall-repo.zip
$ sudo unzip gpmall-repo.zip

$ sudo vi /etc/yum.repos.d/local.repo
# 填入以下内容
[mariadb]
name=mariadb
baseurl=file:///opt/gpmall-repo
gpgcheck=0
enabled=1

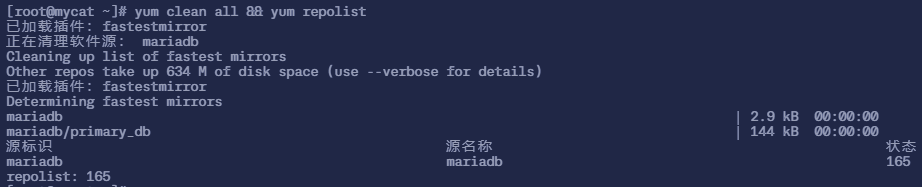
$ sudo yum clean all && yum repolist
已加载插件:fastestmirror
正在清理软件源: mariadb
Cleaning up list of fastest mirrors
Other repos take up 634 M of disk space (use --verbose for details)
已加载插件:fastestmirror
Determining fastest mirrors
mariadb | 2.9 kB 00:00:00
mariadb/primary_db | 144 kB 00:00:00
源标识 源名称 状态
mariadb mariadb 165
repolist: 165

1.3

1.4 安装 JDK 环境

​ 部署 MyCat 中间件服务需要先部署 JDK 1.7 或以上版本,这里部署 JDK 1.8 版本
​ 在 mycat 服务器中

1
2
3
4
5
$ sudo yum install -y java-1.8.0-openjdk java-1.8.0-openjdk-devel
$ java -version
openjdk version "1.8.0_412"
OpenJDK Runtime Environment (build 1.8.0_412-b08)
OpenJDK 64-Bit Server VM (build 25.412-b08, mixed mode)

1.4

2. 部署 MariaDB 主从数据库集群服务

2.1 安装 MariaDB 服务

​ 在 db1 和 db2 节点中执行以下操作

1
2
3
4
5
6
# 安装 MariaDB 服务
$ sudo yum install -y mariadb mariadb-server

# 启动 MariaDB 服务并设置开机自启
$ sudo systemctl start mariadb
$ sudo systemctl enable mariadb
2.2 初始化 MariaDB 数据库

​ 在 db1 和 db2 虚拟机上初始化 MariaDB 数据库,并设置 MariaDB 数据库 root 访问用户的密码为 123456

1
2
3
4
5
6
7
8
9
10
11
12
13
14
15
16
17
18
19
20
21
22
23
24
25
26
27
28
29
30
31
32
33
34
35
36
37
38
39
40
41
42
43
44
45
46
47
48
49
50
51
52
53
54
55
56
57
58
59
60
61
62
63
64
65
66
67
68
69
70
71
72
73
# 运行安全脚本(它可以 设置 root 用户密码、移除匿名用户、禁止 root 用户远程登录、移除测试数据库 等)
$ mysql_secure_installation

NOTE: RUNNING ALL PARTS OF THIS SCRIPT IS RECOMMENDED FOR ALL MariaDB
SERVERS IN PRODUCTION USE! PLEASE READ EACH STEP CAREFULLY!

In order to log into MariaDB to secure it, we'll need the current
password for the root user. If you've just installed MariaDB, and
you haven't set the root password yet, the password will be blank,
so you should just press enter here.

# 这里需要输入当前 root 用户的密码
# 如果刚安装 MariaDB 并还没有设置 root 用户密码,那么密码是空的,按回车即可
Enter current password for root (enter for none): #默认按回车
OK, successfully used password, moving on...

Setting the root password ensures that nobody can log into the MariaDB
root user without the proper authorisation.

# 这里问你是否需要设置 root 用户的密码
# 按 Y 进行设置
Set root passworNew password: #这里输入密码123456
Re-enter new password: #确认密码:再输一遍123456
Password updated successfully!
Reloading privilege tables..
... Success!


By default, a MariaDB installation has an anonymous user, allowing anyone
to log into MariaDB without having to have a user account created for
them. This is intended only for testing, and to make the installation
go a bit smoother. You should remove them before moving into a
production environment.

# 是否移除匿名用户
# 按 Y 进行移除
Remove anonymous users? [Y/n] d? [Y/n] y
... Success!

Normally, root should only be allowed to connect from 'localhost'. This
ensures that someone cannot guess at the root password from the network.

# 是否禁用 root 用户远程登录
# 按 Y 禁用远程登录
Disallow root login remotely? [Y/n] n
... skipping.

By default, MariaDB comes with a database named 'test' that anyone can
access. This is also intended only for testing, and should be removed
before moving into a production environment.

# 是否移除测试数据库 test 及其权限
# 按 Y 移除
Remove test database and access to it? [Y/n] y
- Dropping test database...
... Success!
- Removing privileges on test database...
... Success!

Reloading the privilege tables will ensure that all changes made so far
will take effect immediately.

# 是否重新加载权限表,以确保所有更改立刻生效
# 按 Y 重新加载
Reload privilege tables now? [Y/n]
... Success!

Cleaning up...

All done! If you've completed all of the above steps, your MariaDB
installation should now be secure.

Thanks for using MariaDB!
2.3 配置数据库集群主节点

​ 编辑主节点 db1 虚拟机的数据库配置文件 /etc/my.cnf

1
2
3
4
5
6
7
8
9
10
11
12
13
14
15
16
17
18
$ sudo vi /etc/my.cnf
# 填入以下内容
[mysqld]
log_bin = moka
binlog_ignore_db = mysql
server_id = 131

datadir=/var/lib/mysql
socket=/var/lib/mysql/mysql.sock
# Disabling symbolic-links is recommended to prevent assorted security risks
symbolic-links=0

[mysqld_safe]
log-error=/var/log/mariadb/mariadb.log
pid-file=/var/run/mariadb/mariadb.pid

# 然后重启 MariaDB 服务
$ sudo systemctl restart mariadb

2.3

2.4 开放主节点的数据库权限
1
2
3
4
5
6
7
8
9
10
11
12
13
14
15
16
17
18
19
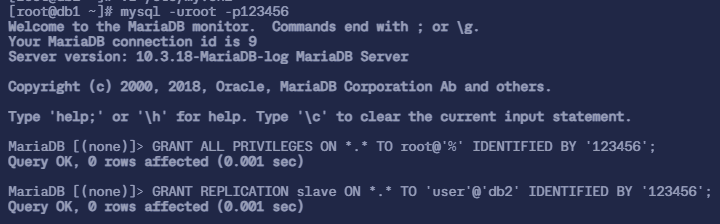
# 在主节点 db1 虚拟机上使用 mysql 命令登录 MariaDB 数据库
$ mysql -uroot -p123456
Welcome to the MariaDB monitor. Commands end with ; or \g.
Your MariaDB connection id is 9
Server version: 10.3.18-MariaDB-log MariaDB Server

Copyright (c) 2000, 2018, Oracle, MariaDB Corporation Ab and others.

Type 'help;' or '\h' for help. Type '\c' to clear the current input statement.

MariaDB [(none)]>

# 授权在任何客户端机器上可以以 root 用户登录到数据库
MariaDB [(none)]> GRANT ALL PRIVILEGES ON *.* TO root@'%' IDENTIFIED BY '123456';
Query OK, 0 rows affected (0.001 sec)

# 在主节点 db1 数据库上创建一个 user 用户让从节点 db2 连接,并赋予从节点同步主数据库的权限
MariaDB [(none)]> GRANT REPLICATION slave ON *.* TO 'user'@'db2' IDENTIFIED BY '123456';
Query OK, 0 rows affected (0.001 sec)

2.4

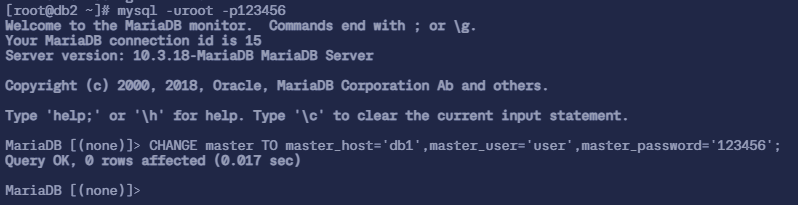
2.5 配置从节点 db2 同步主节点 db1

​ 在从节点 db2 上使用 mysql 命令登录 MariaDB 数据库,配置从节点连接主节点的连接信息

  • master_host 为主节点主机名 db1master_user 则是在上一步中创建的用户 user
1
2
3
4
5
6
7
8
9
10
11
12
13
$ mysql -uroot -p123456
Welcome to the MariaDB monitor. Commands end with ; or \g.
Your MariaDB connection id is 15
Server version: 10.3.18-MariaDB MariaDB Server

Copyright (c) 2000, 2018, Oracle, MariaDB Corporation Ab and others.

Type 'help;' or '\h' for help. Type '\c' to clear the current input statement.

MariaDB [(none)]>

MariaDB [(none)]> CHANGE master TO master_host='db1',master_user='user',master_password='123456';
Query OK, 0 rows affected (0.017 sec)

2.5_1

​ 配置完主从数据库之间的连接信息之后,开启从节点服务

1
2
3
4
5
6
7
8
9
10
11
12
13
14
15
16
17
18
19
20
21
22
23
24
25
26
27
28
29
30
31
32
33
34
35
36
37
38
39
40
41
42
43
44
45
46
47
48
49
50
51
52
53
54
55
56
57
58
59
MariaDB [(none)]> START SLAVE;
Query OK, 0 rows affected (0.004 sec)

MariaDB [(none)]> SHOW SLAVE STATUS\G
*************************** 1. row ***************************
Slave_IO_State: Waiting for master to send event
Master_Host: db1
Master_User: user
Master_Port: 3306
Connect_Retry: 60
Master_Log_File: moka.000001
Read_Master_Log_Pos: 696
Relay_Log_File: db2-relay-bin.000002
Relay_Log_Pos: 990
Relay_Master_Log_File: moka.000001
Slave_IO_Running: Yes
Slave_SQL_Running: Yes
Replicate_Do_DB:
Replicate_Ignore_DB:
Replicate_Do_Table:
Replicate_Ignore_Table:
Replicate_Wild_Do_Table:
Replicate_Wild_Ignore_Table:
Last_Errno: 0
Last_Error:
Skip_Counter: 0
Exec_Master_Log_Pos: 696
Relay_Log_Space: 1297
Until_Condition: None
Until_Log_File:
Until_Log_Pos: 0
Master_SSL_Allowed: No
Master_SSL_CA_File:
Master_SSL_CA_Path:
Master_SSL_Cert:
Master_SSL_Cipher:
Master_SSL_Key:
Seconds_Behind_Master: 0
Master_SSL_Verify_Server_Cert: No
Last_IO_Errno: 0
Last_IO_Error:
Last_SQL_Errno: 0
Last_SQL_Error:
Replicate_Ignore_Server_Ids:
Master_Server_Id: 131
Master_SSL_Crl:
Master_SSL_Crlpath:
Using_Gtid: No
Gtid_IO_Pos:
Replicate_Do_Domain_Ids:
Replicate_Ignore_Domain_Ids:
Parallel_Mode: conservative
SQL_Delay: 0
SQL_Remaining_Delay: NULL
Slave_SQL_Running_State: Slave has read all relay log; waiting for the slave I/O thread to update it
Slave_DDL_Groups: 2
Slave_Non_Transactional_Groups: 0
Slave_Transactional_Groups: 0
1 row in set (0.000 sec)

2.5_2

2.6 验证主从数据库的同步功能

​ 先在主节点 db1 的数据库中创建库 test,并在库 test 中创建表 company,插入表数据

1
2
3
4
5
6
7
8
9
10
11
12
13
14
15
16
17
18
MariaDB [(none)]> CREATE DATABASE test;
Query OK, 1 row affected (0.002 sec)

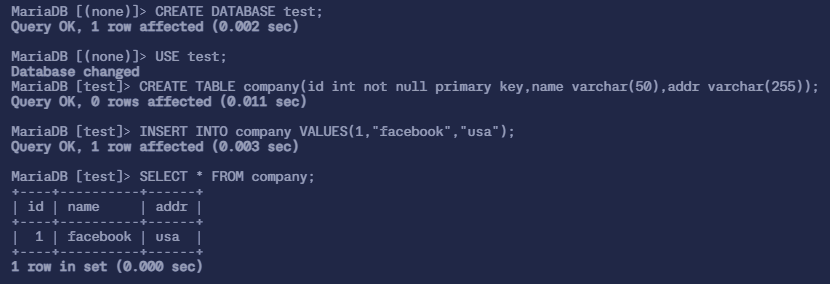
MariaDB [(none)]> USE test;
Database changed
MariaDB [test]> CREATE TABLE company(id int not null primary key,name varchar(50),addr varchar(255));
Query OK, 0 rows affected (0.011 sec)

MariaDB [test]> INSERT INTO company VALUES(1,"facebook","usa");
Query OK, 1 row affected (0.003 sec)

MariaDB [test]> SELECT * FROM company;
+----+----------+------+
| id | name | addr |
+----+----------+------+
| 1 | facebook | usa |
+----+----------+------+
1 row in set (0.000 sec)

2.6_1

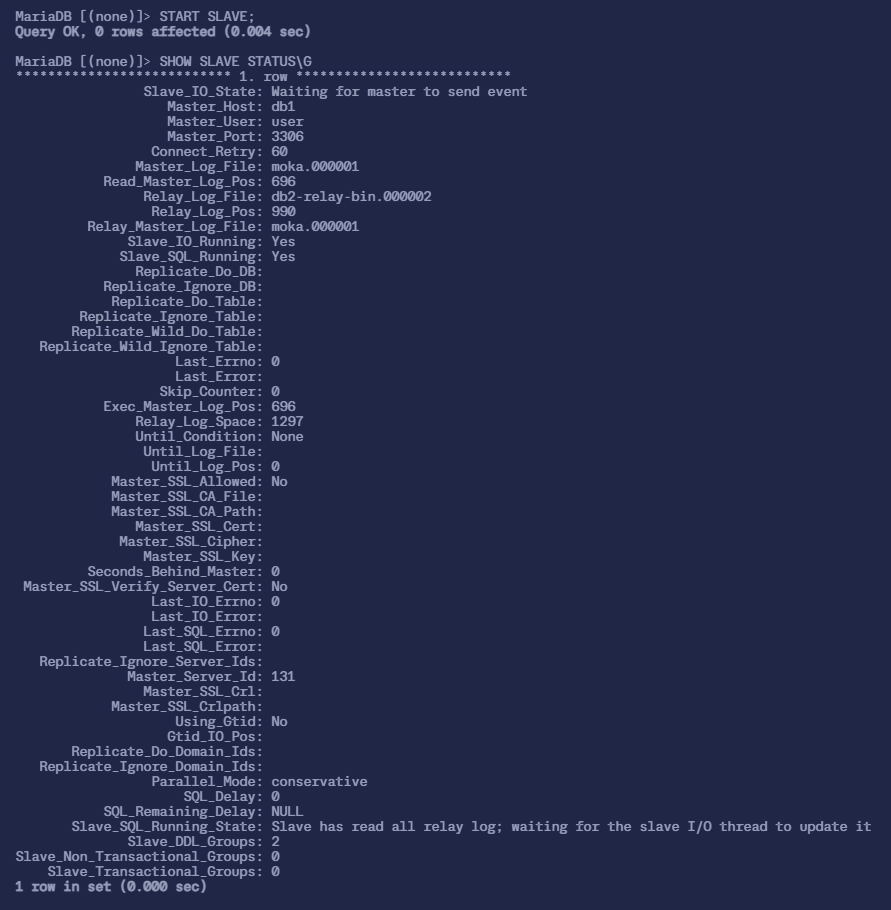
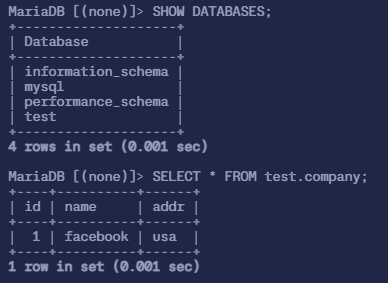
​ 此时 从节点 db2 的数据库就会同步主节点数据库创建的 test 库,可以在从节点查询 test 数据库与表 company
​ 如果可以查询到信息,就能验证主从数据库集群功能在正常运行

1
2
3
4
5
6
7
8
9
10
11
12
13
14
15
16
17
18
MariaDB [(none)]> SHOW DATABASES;
+--------------------+
| Database |
+--------------------+
| information_schema |
| mysql |
| performance_schema |
| test |
+--------------------+
4 rows in set (0.001 sec)

MariaDB [(none)]> SELECT * FROM test.company;
+----+----------+------+
| id | name | addr |
+----+----------+------+
| 1 | facebook | usa |
+----+----------+------+
1 row in set (0.001 sec)
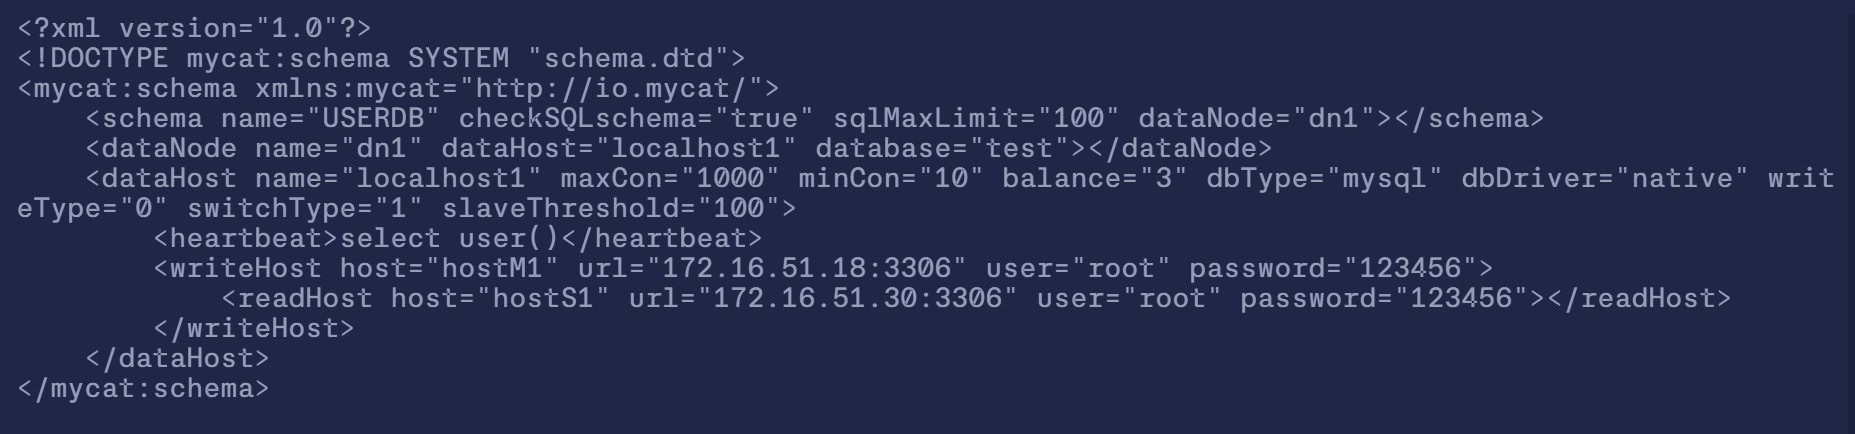
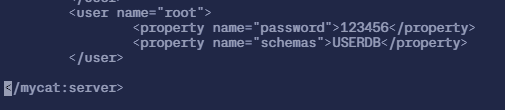
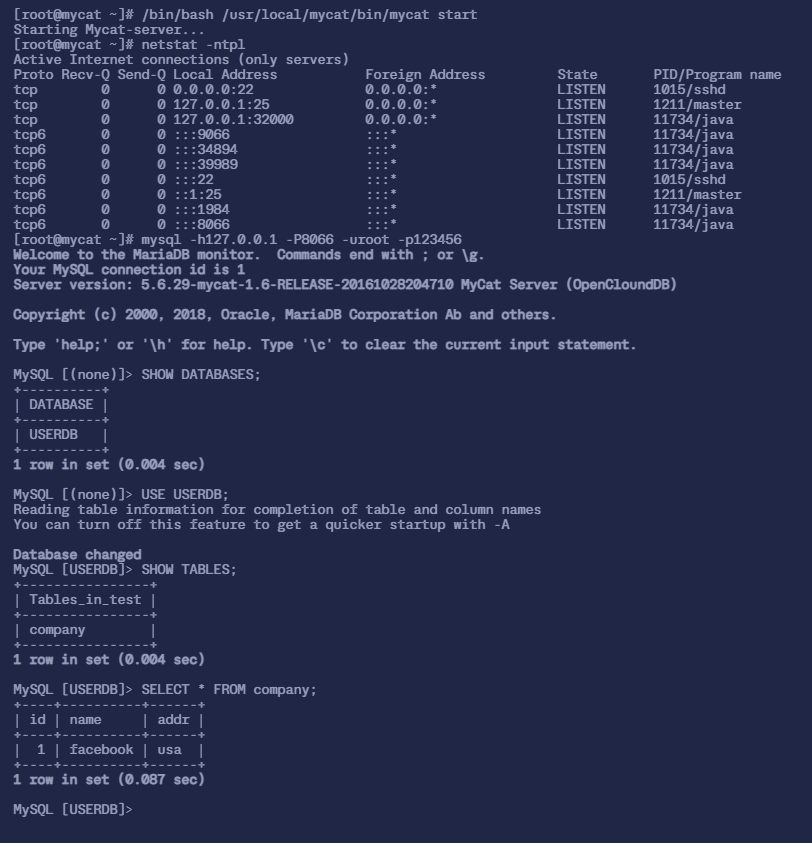
2.6_2

3. 部署 MyCat 读写分离中间件服务

3.1 安装 MyCat 服务

​ 在 mycat 虚拟机上进行操作

1
2
3
4
5
6
7
8
9
10
11
12
13
# 安装 wget 服务
$ sudo yum install -y wget

# 下载 Mycat-server-1.6-RELEASE-20161028204710-linux.tar.gz
$ sudo wget https://moka.anitsuri.top/images/mycat_db/Mycat-server-1.6-RELEASE-20161028204710-linux.tar.gz

# 解压到 /usr/local,并赋予权限
$ sudo tar -zxf Mycat-server-1.6-RELEASE-20161028204710-linux.tar.gz -C /usr/local/
$ sudo chown -R 777 /usr/local/mycat/

# 给 mycat 添加到系统变量中并生效系统变量
$ echo MYCAT_HOME=/usr/local/mycat/ >> /etc/profile
$ source /etc/profile

3.1

3.2 编辑 Mycat 的逻辑库配置文件

​ 配置 Mycat 服务读写分离的 schema.xml 配置文件在 /usr/local/mycat/conf/ 目录下,可以在文件中定义一个逻辑库,使用户可以通过 Mycat 服务管理该逻辑库对应的 MariaDB 数据库

  • 定义一个逻辑库 schema,nameUSERDB
  • 该逻辑库对应数据库 database 为 test(刚刚主从数据库的时候整的那个)
  • 设置数据库写入节点为主节点 db1,设置数据库读取节点为从节点 db2

​ (可以删除原有 schema.xml 的内容,替换成下面这个)

1
2
3
4
5
6
7
8
9
10
11
12
13
14
15
16
17
18
19
20
21
22
23
24
25
26
$ sudo vi /usr/local/mycat/conf/schema.xml
# 文件内容替换成如下 '要把IP改为真实的IP'

<?xml version="1.0"?>
<!DOCTYPE mycat:schema SYSTEM "schema.dtd">
<mycat:schema xmlns:mycat="http://io.mycat/">
<!-- 定义逻辑库 USERDB 并关联数据节点 dn1 -->
<schema name="USERDB" checkSQLschema="true" sqlMaxLimit="100" dataNode="dn1"></schema>

<!-- 定义数据节点 dn1,关联到数据主机 localhost1 -->
<dataNode name="dn1" dataHost="localhost1" database="test"></dataNode>

<!-- 定义数据主机 localhost1,关联到物理数据库服务器 -->
<dataHost name="localhost1" maxCon="1000" minCon="10" balance="3"
dbType="mysql" dbDriver="native" writeType="0" switchType="1" slaveThreshold="100">
<heartbeat>select user()</heartbeat>

<!-- 主节点 db1 的 IP 地址及 MySQL 配置信息 -->
<writeHost host="hostM1" url="192.168.92.131:3306" user="root" password="123456">
<!-- 从节点 db2 的 IP 地址及 MySQL 配置信息 -->
<readHost host="hostS1" url="192.168.92.132:3306" user="root" password="123456"></readHost>
</writeHost>
</dataHost>
</mycat:schema>


  • 注:
    • sqlMaxLimit:配置默认查询数量
    • database:配置真实数据库名
    • balance="0":不开启读写分离机制,所有读操作都发送到当前可用的 writeHost
    • balance="1":全部的 readHoststand by writeHost 参与 select 语句的负载均衡
    • balance="2":所有读操作都随机的在 writeHostreadHost 上分发
    • balance="3":所有读请求随机地分发到 writeHost 对应的 readHost 执行,writeHost 不负担读压力(注:这个东西只在 1.4 及其之后的版本才有,1.3 之前的版本都没有)
    • writeType="0":所有写操作发送配置的第一个 writeHost,第一个挂了需要切换到还生存的第二个 writeHost,重新启动后以切换后的为准,切换记录在配置文件 dnindex.properties

3.2

​ 然后修改 schema.xml 的用户权限

1
$ sudo chown root.root /usr/local/mycat/conf/schema.xml
3.3 编辑 mycat 的访问用户

​ 修改 /usr/local/mycat/conf 目录下的 server.xml 文件,修改 root 用户的访问密码与数据库,密码设置为 123456,访问 MyCat 的逻辑库为 USERDB

1
2
3
4
5
6
7
8
9
10
11
12
13
14
15
16
17
18
19
20
21
22
$ sudo vi /usr/local/mycat/conf/server.xml

# 在文件的最后部分添加上
<user name="root">
<property name="password">123456</property>
<property name="schemas">USERDB</property>
</user>

# 在文件的最后删除掉
<user name="user">
<property name="password">user</property>
<property name="schemas">TESTDB</property>
<property name="readOnly">true</property>
</user>

# 然后删除掉32和35行的 <!-- 和 --> 使其变成
<property name="serverPort">8066</property>
<property name="managerPort">9066</property>
<property name="idleTimeout">300000</property>
<property name="bindIp">0.0.0.0</property>
<property name="frontWriteQueueSize">4096</property>
<property name="processors">32</property>

3.3

3.4 启动 MyCat 服务
1
2
3
4
5
6
7
8
9
10
11
12
13
14
15
16
17
18
19
20
# 启动 MyCat 数据库中间件服务
$ sudo /bin/bash /usr/local/mycat/bin/mycat start

# 安装 net-tools,以便后续使用 netstat
$ sudo yum install -y net-tools

# 查看 8066 和 9066 端口是否开放,如果开放则说明 MyCat 服务开启成功
$ netstat -ntpl
Active Internet connections (only servers)
Proto Recv-Q Send-Q Local Address Foreign Address State PID/Program name
tcp 0 0 0.0.0.0:22 0.0.0.0:* LISTEN 1015/sshd
tcp 0 0 127.0.0.1:25 0.0.0.0:* LISTEN 1211/master
tcp 0 0 127.0.0.1:32000 0.0.0.0:* LISTEN 11071/java
tcp6 0 0 :::38471 :::* LISTEN 11071/java
tcp6 0 0 :::9066 :::* LISTEN 11071/java
tcp6 0 0 :::22 :::* LISTEN 1015/sshd
tcp6 0 0 ::1:25 :::* LISTEN 1211/master
tcp6 0 0 :::1984 :::* LISTEN 11071/java
tcp6 0 0 :::8066 :::* LISTEN 11071/java
tcp6 0 0 :::42978 :::* LISTEN 11071/java

3.4

4. 验证数据库集群服务读写分离功能

4.1 用 MyCat 服务查询数据库信息

​ 在 mycat 虚拟机上

1
2
3
4
5
6
7
8
9
10
11
12
13
14
15
16
17
18
19
20
21
22
23
24
25
26
27
28
29
30
31
32
33
34
35
36
37
38
39
40
# 安装 mariadb-client 服务
$ sudo yum install -y mariadb-client

# 查看 mycat 的服务库 USERDB(它对应的是数据库 test
$ mysql -h127.0.0.1 -P8066 -uroot -p123456
Welcome to the MariaDB monitor. Commands end with ; or \g.
Your MySQL connection id is 1
Server version: 5.6.29-mycat-1.6-RELEASE-20161028204710 MyCat Server (OpenCloundDB)

Copyright (c) 2000, 2018, Oracle, MariaDB Corporation Ab and others.

Type 'help;' or '\h' for help. Type '\c' to clear the current input statement.

MySQL [(none)]>
MySQL [(none)]> SHOW DATABASES;
+----------+
| DATABASE |
+----------+
| USERDB |
+----------+
1 row in set (0.004 sec)

MySQL [(none)]> USE USERDB;
Database changed

MySQL [USERDB]> SHOW TABLES;
+----------------+
| Tables_in_test |
+----------------+
| company |
+----------------+
1 row in set (0.004 sec)

MySQL [USERDB]> SELECT * FROM company;
+----+----------+------+
| id | name | addr |
+----+----------+------+
| 1 | facebook | usa |
+----+----------+------+
1 row in set (0.087 sec)
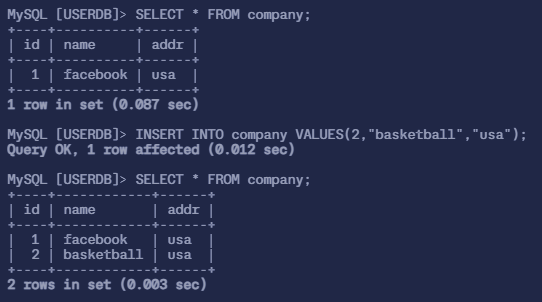
4.1

4.2 用 MyCat 服务添加表数据
1
2
3
4
5
6
7
8
9
10
11
12
13
# 在 MyCat 上使用 mysql 命令对标 company 添加一条数据 `(2,"basketball","usa")`
MySQL [USERDB]> INSERT INTO company VALUES(2,"basketball","usa");
Query OK, 1 row affected (0.012 sec)

# 查看表信息
MySQL [USERDB]> SELECT * FROM company;
+----+------------+------+
| id | name | addr |
+----+------------+------+
| 1 | facebook | usa |
| 2 | basketball | usa |
+----+------------+------+
2 rows in set (0.003 sec)

4.2

4.3 验证 MyCat 服务对数据库读写操作分离

​ 在 mycat 虚拟机上使用 mysql 命令,通过 9066 端口查询对数据库读写操作的分离信息

1
2
3
4
5
6
7
$ [root@mycat ~]# mysql -h127.0.0.1 -P9066 -uroot -p123456 -e 'show  @@datasource;'
+----------+--------+-------+----------------+------+------+--------+------+------+---------+-----------+------------+
| DATANODE | NAME | TYPE | HOST | PORT | W/R | ACTIVE | IDLE | SIZE | EXECUTE | READ_LOAD | WRITE_LOAD |
+----------+--------+-------+----------------+------+------+--------+------+------+---------+-----------+------------+
| dn1 | hostM1 | mysql | 192.168.92.131 | 3306 | W | 0 | 10 | 1000 | 92 | 0 | 1 |
| dn1 | hostS1 | mysql | 192.168.92.132 | 3306 | R | 0 | 6 | 1000 | 91 | 4 | 0 |
+----------+--------+-------+----------------+------+------+--------+------+------+---------+-----------+------------+

4.3

​ 至此,MyCat 读写分离案例完成!


MyCat 读写分离数据库集群 操作文档
https://moka.anitsuri.top/2024/08/29/MyCat_Cluster/
作者
アニつり
发布于
2024年8月30日
许可协议